Long Picots
I don't normally use picot gauges when tatting especially when the patterns asks for regular picots, whether joining picots or decorative picots. I don't even do graduated picots if the overall design of the pattern does not really need them.
But I do use gauges and measure my picots if they are really long ones. Otherwise, why wold the pattern specify long picots. You can't do woven pcots without even-sized long picots like in this link here, http://www.georgiaseitz.com/2004/rietwovenbkmk.jpg. Or, work a tatted hairpin lace like this in Martha Ess' blog, http://marthas-tatting-blog.blogspot.my/2015/11/hairpin-lace-real-and-mock-kinda-long.html
I am currently working on a pattern where I have put in long picots. Very long picots, about 3in closed long picots. Now, I could easily cut a piece of card paper 3in wide and use that as my picot gauge, but I can imagne how cumbersome it would be holding holding a large piece of picot gauge.
And then, I had this idea where you can make different lengths of picot with a small picot gauge. Here's how.
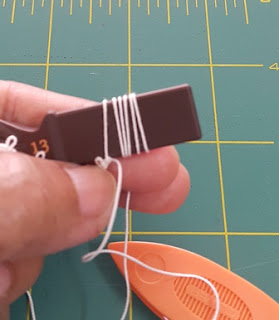
Using a regular picot gauge, loop the thread over the picot gauge several times until you reach the length of the picot that you need. In my case here, for the size of picot that I want, I looped six times over the width of the picot gauge.
While the loops are still on the picot gauge, make the next double stitch to lock the picot in.
You can remove the picot gauge after a few double stitches are made, or you can continue tatting to finish the ring, as I did here.
You can see how long the picots are when I removed the picot gauge.
I have used picot gauge #13 because that is the widest that I have so I don't have to loop the thread too many times. You can use a smaller picot gauge to suit the size that you need.
And, that's it.
A short update.
But I do use gauges and measure my picots if they are really long ones. Otherwise, why wold the pattern specify long picots. You can't do woven pcots without even-sized long picots like in this link here, http://www.georgiaseitz.com/2004/rietwovenbkmk.jpg. Or, work a tatted hairpin lace like this in Martha Ess' blog, http://marthas-tatting-blog.blogspot.my/2015/11/hairpin-lace-real-and-mock-kinda-long.html
I am currently working on a pattern where I have put in long picots. Very long picots, about 3in closed long picots. Now, I could easily cut a piece of card paper 3in wide and use that as my picot gauge, but I can imagne how cumbersome it would be holding holding a large piece of picot gauge.
And then, I had this idea where you can make different lengths of picot with a small picot gauge. Here's how.
This is the size of picots that I need in my patern, slightly over 3in.
Using a regular picot gauge, loop the thread over the picot gauge several times until you reach the length of the picot that you need. In my case here, for the size of picot that I want, I looped six times over the width of the picot gauge.
While the loops are still on the picot gauge, make the next double stitch to lock the picot in.
You can remove the picot gauge after a few double stitches are made, or you can continue tatting to finish the ring, as I did here.
You can see how long the picots are when I removed the picot gauge.
I have used picot gauge #13 because that is the widest that I have so I don't have to loop the thread too many times. You can use a smaller picot gauge to suit the size that you need.
And, that's it.
+---- + ----- + ----- + ----- + ---- +
A short update.


I only use a gauge for very long picots too. Thanks for the tip. The Masterpiece is looking fantastic - worth spending time over.
ReplyDeleteThank you so much for this tutorial.
ReplyDeleteThe JS is truly lovely! What a great idea to get the very long picots and less cumbersome.
ReplyDeleteThe doily looks great. I have yet to start that pattern. I am very curious to see the pattern requiring such long picots. What a great idea for how to make them. I've done picots 2" high when closed and it isn't easy. Thank you for sharing your method.
ReplyDeleteI have the same gages and really like them. Thanks for the info on how to handle really long picots.
ReplyDeleteFor the monster doily, on to round 9. It takes a while to tat this doily, but it is totally worth it. You will enjoy it for many years to come.
What a great idea for measuring long picots! It sounds like what Riego was describing in the very old patterns (from the 1800s), for example: "make an extra pearl loop by turning the cotton twice around the pin". Now, I finally understand that the "pin" was a picot gauge! Excellent tutorial, thank you!
ReplyDeleteAmazing masterpiece.💕
ReplyDeleteI can't wait to see what you are making with those super long picots!!! :)
ReplyDeleteAnd your doily is very beautiful!!! :)
Looking forward to seeing this long picot project
ReplyDelete