Showing posts with label Norma Benporath. Show all posts

23 Apr 2021

Another Norma Benporath Project

 After completing the Exquisite Lace Mat, I started on another Norma Benporath pattern from the Trove,

https://trove.nla.gov.au/newspaper/article/23337753, Fairylike Lace.

I am already up to Round 4 of this doily,

Round 1

Round 2

Round 3

Round 4

There are three more parts after this, a round of shuttle-only wheels, and a scallop edging made in two parts. 

7 Apr 2021

Norma Benporath's Exquisite Lace Mat - Done

I started this project on the last day of January and finished it in a little over nine weeks.

A very satisfying tat although there were challenges especially when a major part of it contains small individual motifs.


Pattern can be found here, https://trove.nla.gov.au/newspaper/article/145240787?

Thread is Olympus Special No. 40

  • Green - #221
  • Yellow - #541
  • Dark Tan - #733
  • Pink - #104
  • Mix colour (yellow & pink) - #M3
Finished size is 36cm diameter.
 

11 Mar 2021

Norma Benporath - Exquisite Lace Mat

 Round 6 - done. three more rounds to go.


Thread: Olympus Gold Special #40, shuttle-tatted

Current size: 25cm across

Pattern from: https://trove.nla.gov.au/newspaper/article/145240787

7 Mar 2021

Round 5 - NB Exquisite Lace Mat

I have completed Round 5 of the lace mat ( Norma Benporath Exquisite Lace Mat ) and just about half-way of Round 6.


This is the mat after Round 5

I did a switch in the sequence of the rounds after completing Round 3.  Instead of continuing with Round 4 as in the instructions, I jumped to Round 5. In the photo above, Round 5 is the pink individual 5-rings motifs and Round 3 is made up of the stand-alone 3-rings clover motifs. 

I went back to do Round 4 after I had completed all the pink motif.  Round 4, as per the instructions, is the round made up of repeats of rings and chain, tatted in green.  It is the outermost round in the photo above. I just felt that it was easier to do the switch after reading the instructions in detail, and it was.

The thread I am using for this project is Olympus Gold Special.

27 Feb 2021

Norma Benporath Exquisite Lace Mat - Rd 2 & 3

Completed Rounds 2 & 3 of the lace mat. Round 2 was quite a straight forward round of rings & chains. Round 3 was also easy but rather lengthy because of the individual clovers, all 20 of them.


 For the clovers, I started each one by tatting over tails which only leaves me with one end to hide which I sewed in.  That saves half of my time spent on hiding ends.

For the next step, I started with Round 5 instead of Round 4.  Round 5 is again made up of individual 5-rings motif.  Reading the pattern, I find it easier to do Round 5 first, then go back for Round 4. Photos of this part will be in the next update on this project.

6 Feb 2021

Norma Benporath Doily


 I have just started a few repeats of Round 2. The daisy and the stand-alone clovers around it is what the pattern called its foundation round.

Rounds 1 and 2 are quite easy rounds but the next couple of rounds are back to stand-alone clovers and 5-rings motifs.  I think those will slow me down incredibly with cut and hide after each motif.

The pattern for this Exquisite Lace Mat in Tatting can be found in the Trove site. (click on the link in the name of the doily)

31 Jan 2021

An Exquisite Lace in Tatting by Norma Benporath

 After so many years since I last did one, I decided to try another Norma Benporath pattern from the Trove site.  This is the design that I have picked,


The pattern was published in The Australian on 1 September 1934 with the title, An Exquisite Lace Mat in Tatting. 

If you wish to join me as a tat-along for this lace mat, you can download the pattern from the site.  When you open the link, there is an option in the column on the left for the download, choose 'PDF'.  The full pattern in given in two parts. You may have to click 'Next', or the arrow > a few times to get the 2nd part of the pattern which is shown together with a recipe for Apple Cinnamon.

If you decide the try out the recipe to enjoy while tatting this lace mat, do give a feedback of it, 😊😊

The centre is a single shuttle daisy with eight petals.


Below are some notes on how I tatted this centre.

1. (top left) It is good to hide the tails at the beginning and prepare to hide the tails at the end. Before I start, I fold the thread to make a loop and hide the beginning tail with the first few double stitches (ds).
Jane Eborall described this method clearly in her tutorial, http://janeeborall.freeservers.com/StartRingCatchThread2.pdf

2. (top right) I leave the loop visible when I close the centre ring, which will be used later.

3. (bottom left) Make a lock join to the next picot of the centre ring before starting the next petal of the daisy. You will need to the the folded join method to join the last petal to the picot in the first petal, or this method used by Jane Eborall, http://www.janeeborall.freeservers.com/JoinlastRfirstring...

4. (bottom right) After completing the final petal, I cut off a length of thread (about 12-15cm) and bring it through the small loop that I have kept at the beginning. I then pulled the tail end of the loop to secure the thread, then I sew in the ending tail.
Note: You may use the magic thread method to hide the ending tail, but I am always comfortable sewing it in.

I am not planning to draw a chart for this pattern like I did the last time, but I will be sharing photos after each round.

11 Dec 2013

After the lull

After taking a tatting break following the huge work on the Mystery Doily, I picked up the shuttles again.

I wanted to re-work this doily after comments from my test-tatter (thank you, Lady Test-Tatter). As often happens, I get distracted by new ideas that seem to push everything else away, and this is what turned out.
I still need to do the re-work of the earlier doily as there are some interesting elements in there that I want to keep.  I just hope I don't get distracted again.

Doily WIP - thread is Milford Mercer #40
At this point, when I finish this last round, the doily's measurement will be about 8 inches wide.  I am having a thought as to whether I should stop at this round or add more rounds to it.

In the meantime, I decide to try a new technique that I have not tried before, Maltese rings.  Here are a couple of my attempts, 

It was quite confusing at the beginning, but once I understand the concept it flows quite smoothly. And this is the real thing,
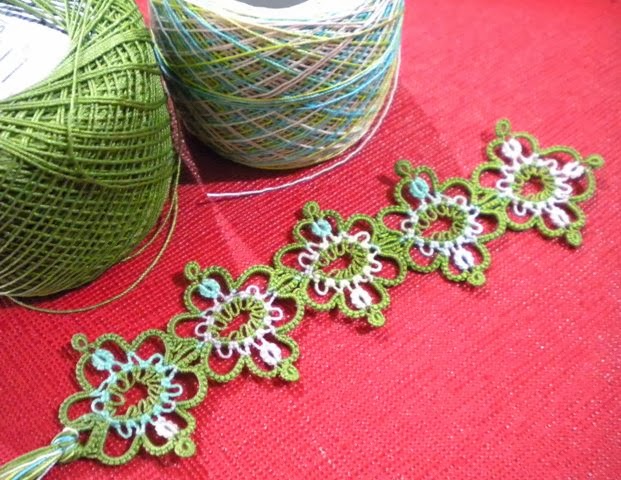
This is Gloria's Maltese Bookmark pattern by Martha Ess.  The thread used is Lisbeth 684 for the solid and Lizbeth 109 for the multi-coloured, both in size 40.  You may not be able to see it in the picture, but each maltese ring is of a different colour - one the surprises of using variegated thread in tatting.

This unfinished oval medallion is a Norma Benporath pattern from her book, "Tatting Illustrated'.  I plan to turn it into another bookmark.

12 Jun 2013

The Needle, the Shuttle and the Book

I tried, honestly, I tried .... but, I am giving up on it now after turning out something like this,


This is as far that I can take of this bookmark, tatting with a needle. Certainly not my best work.  I finally gave up after the clover at the top turned out all wonky.  I will never be a needle-tatter.
Dear needle-tatters, how do your work all come out so neat and pretty?

It was supposed to look like this, tatted with a shuttle, of course

Then, I went over the brink and splurged on shuttles, one in each colour of the Aerlit shuttles.  I don't know what came over me ... as if I needed any more shuttles!  And I don't tat with bobbin shuttles much, preferring my post shuttles.

And now, the best part of this blog,
This

Out of the blue, Liyarra offered me this book, 
Every Woman's Complete Guide to Tatting Illustrated
by Norma Benporath

The book jacket is all worn out but the pages are intact.  The paper of the pages feels 'crispy'. I feel that I have to be gentle when turning the pages, afraid that it will tear. I was looking in the inside pages to see what year the book was printed but I cannot find any. 

There are so many beautiful designs in there, over 100 designs it says in the book, from edgings, medallions, doilies, mats and many more.  I don't know where to start.  There is also a picture of a square table-cloth with insertions of the suit of card that I blogged earlier, one on each side.  

This is totally unexpected and I can't thank you enough, Liyarra.  

6 Jun 2013

NB Diamond Motif Doily

Thought you'd like to see the how the diamond doily is shaping up,

Just try and ignore all the loose ends.

I posted a picture in my Facebook with only two motifs joined and the reaction to it was that it could be a cat or a fox.  See if you agree,


The pattern for the diamond motif is from here.

2 Jun 2013

Edging and Insertion - 26 Oct 1938

Another beautiful edging pattern and insertions from Norma Benporath can be found on this page of the Trove site.

I have only tatted the edging and the diamond-shaped insertion.  The design for the star insertion is rather common today and several designers have come out with something close to it, so I have not tatted it. However, it is the edging and the diamond insertion that I find interesting.

First, the edging - now this is one design where using a modern technique really saves a lot of trouble.
Miss Benporath's pattern for the edging starts by tatting the large rings that forms the centre of the scallop. These rings are made separately on its own and saved until required.  You can imagine how many of these rings will need to be made one by one if the edging is a long one.

This is where mock rings came in handy.  The picture below explains how I did it.


I started with a mock ring instead of a regular ring as in the pattern. Half-way through the mock ring, I used the second shuttle to make the large ring.  I then finished the mock ring and close it to complete the first ring. The rest of the tatting then follows as per the pattern until the next repeat, where again, the first ring of the repeat is a mock ring.

If you plan to tat this edging, please note that the stitch count for the large ring in the middle of the scallop was missing from the original article, probably through poor editing.  So I guesstimated the size by looking at the print photo.  It seemed to work.  Here is the stitch count, following the mock ring method that I used,
R(5-3-5-3-5-3-5-3)

The second piece from this article is the diamond insertion.
This is an easy pattern made up of two rounds not counting the small ring in the centre.  Again, this can easily be tatted in one pass with the use of split rings and split chains.  Nothing interesting here, except that I had this sudden thought - can the diamond motif be used to make a doily?

I have not actually tatted it, but after copying and pasting the image a few times, I think it will make a rather lovely piece of doily.


What do you think?
I forgot to mention this earlier - the length of the diamond motif is about 14cm or 5.5cm using size 20 thread.  This would make quite a sizable doily.

20 May 2013

4 of a kind

..... not quite .....

While browsing through some of Miss Norma Benporath's patterns in the Trove site, I came across this set of patterns.
Though, poker was not what Miss Benporath had in mind when she designed this.  I am not a cardplayer myself, but the designs are simple and easy enough that I just had to tat them.

If you want to tat them yourselves, the pattern was published on 15 February 1939 in the article New Linen for the Bridge Table.  All are tatted with shuttle-and-ball except for the 4-leaf clover in the centre of the diamond which is shuttle-only.

11 May 2013

NB Edging from 8 April 1937 - revised.

I read Ladytats' comment to the earlier post and is reproduced here;

just curious, and looking at old pattern pictures is sometimes difficult, but I don't think that one set of rings in the picture are tre-foils.
On left side just above the corner is the clearest, and to me it looks like ring~ring~chain~Ring joined to prev row~ch~ring joined to previous row~ring~ch joined to prev ch and to previous ring~ch~ring~ring (which is back to the beginning of the repeat.)


I took a good look at the original picture and can see that there is a chain between the two rings that is joined to Row 2, but that part was missing from the instructions. Here is the original image which I downloaded from the site,

I tatted Row 3 again but made some changes to the stitch count in the chains.  I also added the missing link, but only guesstimated the stitch count since it was not given in the pattern.  

The one I tatted earlier is on the right, and the revised version is at the bottom.  I reduced the stitch count in the chains by 6ds, and added 9ds for the missing chain.  I also joined the 3rd chain to the 5th chain to make Row 3 a bit sturdier. I like it better this way.  

10 May 2013

NB Edging from 8 April 1937

This edging is from Norma Benporath was published on 8th April 1937 in The Queenslander.  It is another square edging, made up of three rows.

The first two rows worked out nicely, but the third row did not turn out as I would have liked, even though I had followed the pattern without making any changes to the stitch count.

The chains in Row 3 are overlapping each other, as you can see in this close-up photo.    I am not sure if blocking will straighten the chains out, but again, the overlaps could be what was intended with this design.

It is a beautiful design, but I prefer my tatting to lay as flat as possible.  If I were to tat this again, I may remove one of the chains and replace one of the rings with a split ring.

5 May 2013

NB Edging - corner done

Update on the re-working of the square edging by Norma Benporath from this Trove site, published in The Queenslander on 25th Feb 1937.

I have finished doing the corner as shown below.


In this edging, the corner is made up of a cloverleaf which is tatted through with the rest of the edging, and the flower motif is tatted later.  The corner flower motif appears a bit wobbly as it is, so I may consider suggesting that extra joins be made in the two additional chains on the left and right of it.

4 May 2013

NB Edging Part 2

This is the first repeat of the edging of the Norma Benporath pattern that I started in the previous post.

I was a bit confused when trying to determine the stitch count in the chains that form the 'stem' of the flower. Could not rely much on the picture either. This completes the first repeat of the edging.

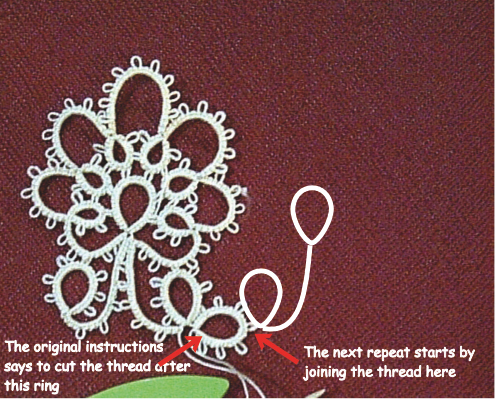
Following the instructions, I am to cut the thread at this point and re-attach the thread at the middle picot of the last ring to begin the next repeat, as illustrated below.

I think you can guess what is screaming out to me -
"Split Rings"
Here is with two repeats done, with the split ring between the two.
Next is to do the corner.

3 May 2013

NB Edging from 1937

I have not worked on any Norma Benporath's pattern for quite a long while, so I thought I should tat another one.  I picked a simple one this time. This was published in The Queenslander on 27th February 1937.  There are three designs there, two edgings and a square motif.

I started with a few rings of the square edging, following exactly as the written instruction published.  It does not look at all like  the picture in the paper.
It is too early to make any conclusions, but I can see that there should be a DNR (do not reverse) when making the 2nd ring, which is not apparent in the instructions.

I am going off now and will continue later tonight.  I think this will turn out well.

20 Jan 2013

Poll result

Hosting the tat-along of the Lace Mat pattern by Norma Benporath must the most brilliant thing that I have done, even if I say so myself.  Looking at the different version of Lace Mats, I think most, if not all, of you enjoyed the adventure too.  Congratulations all round to the 35 tatters who have submitted their Lace Mats.

The Lace Mat poll finally closed a few days ago with 52 people voted, and it is only now that I managed to finish verifying and checking the scores again.  On the penultimate day of voting, there was a tie for the top place.  But a few entries on the last day tipped the scale for one of the Lace Mats.

To finally  rid you of the suspense of waiting, here are the top five Lace Mats tallied after the poll is closed, in the sequence that they appear in the Gallery:

6  8  13  27  34

And the Lace Mat that polled the highest with 26 points is:
No. 34 by Martha Ess
Congratulations Martha!

As promised, I will be putting together some goodies for the winner, and I hope Martha is going to like them and will be able to find ways to use them in her tatting.

I forgot to add -
Nobody had listed the lace mats as in the final top five.  The closest to it is from four persons who managed to get four.  I guess there are no winners in that category.  

12 Dec 2012

Lace Mat Poll - details coming soon

Here is a collage of 21 out of 26 Lace Mats that I have received so far,

In preparation for the poll, I am removing the names of the tatters of each Lace Mat and only assign a number.  That is to ensure that there are no undue advantage to any tatter when the polling starts in ealy January.

You may still submit a picture of your Lace Mat until 31st December 2012 be included in the listing for the poll.  I will add it to the Gallery but will not include your name with it.

I have not put together the goodies for the winner.  When I do, I will try to put together things that appeal to tatters.  Who knows, I may decide to have more than one winner, ;)

17 Nov 2012

Working on the next NB Pattern

I've been quiet in recent weeks because I have not been tatting much and there isn't much to share anyway.  I did put up short posts in my Facebook page though, (also named) Tat-a-Renda.

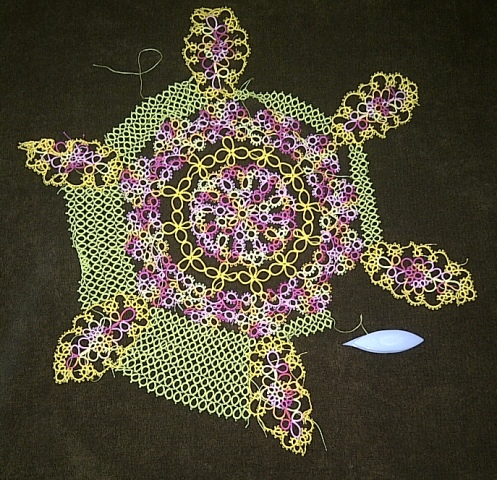
My progress with the large NB doily has been slow too.  This is the latest picture of it.
I thought I can be done with the mesh or rings before I start on the next drawing of another NB's pattern but it is not moving fast enough.  So, I decided to work on charting the NB medalllion pattern from the Trove site, linked here.

I have tatted these medallions before and wrote about it earlier. I decided to tat them again because I did not finish tatting all three.  I need to get them done and post the pictures together with the charts before sharing in my blog.  I have finished the largest of the three which is this oblong shape shown here, and have started on one of the squares.

Tetradill - a square motif

 I was travelling in Xi'an, China and saw designs of pavement tiles that I like. This design was inspired by one of the tiles. The photo...

Many liked this from earlier