Showing posts with label edging. Show all posts

19 Jul 2013

Quietly Tatting

Not much tatting done - but I have this to share -

Everyone would recognise this simple single-shuttle edging design,

Most times, the pattern for this design is shown as a straight edging. It is left to the tatter to figure out how to incorporate a corner into it.

However, in general, there are designers who have included the steps for corners in edging patterns.  One that quickly comes to mind is Mary Konior.

Anyway, I'd like to share my version of the corner for this edging -

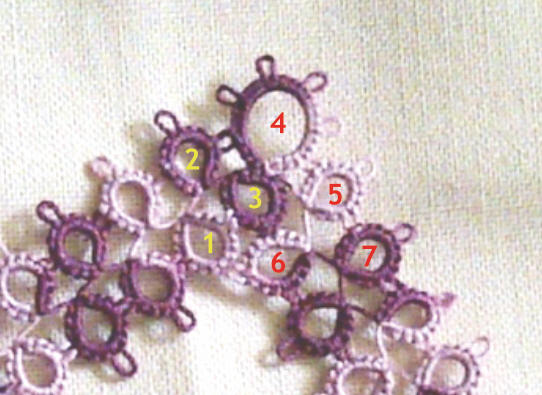
This larger picture shows how I made the corner.

The rings are all 4-4-4-4 stitch count, except for Ring 4, which has 6 picots separated by 4ds.  The numbers give the sequence for making the rings at the corner.

  • Tat the Rings 1, 2 and 3 as usual, followed by Ring 4. 
  • Before making Ring 5, do a lock join to the last picot of Ring 3, followed by Ring 5.
  • Reverse and tat Ring 6, joining to picot of Ring 3, followed by another join to picot of Ring 1 and finish off the rest of the ring.
  • Continue with the rest of the straight side from Ring 7 onwards.


2 Jun 2013

Edging and Insertion - 26 Oct 1938

Another beautiful edging pattern and insertions from Norma Benporath can be found on this page of the Trove site.

I have only tatted the edging and the diamond-shaped insertion.  The design for the star insertion is rather common today and several designers have come out with something close to it, so I have not tatted it. However, it is the edging and the diamond insertion that I find interesting.

First, the edging - now this is one design where using a modern technique really saves a lot of trouble.
Miss Benporath's pattern for the edging starts by tatting the large rings that forms the centre of the scallop. These rings are made separately on its own and saved until required.  You can imagine how many of these rings will need to be made one by one if the edging is a long one.

This is where mock rings came in handy.  The picture below explains how I did it.


I started with a mock ring instead of a regular ring as in the pattern. Half-way through the mock ring, I used the second shuttle to make the large ring.  I then finished the mock ring and close it to complete the first ring. The rest of the tatting then follows as per the pattern until the next repeat, where again, the first ring of the repeat is a mock ring.

If you plan to tat this edging, please note that the stitch count for the large ring in the middle of the scallop was missing from the original article, probably through poor editing.  So I guesstimated the size by looking at the print photo.  It seemed to work.  Here is the stitch count, following the mock ring method that I used,
R(5-3-5-3-5-3-5-3)

The second piece from this article is the diamond insertion.
This is an easy pattern made up of two rounds not counting the small ring in the centre.  Again, this can easily be tatted in one pass with the use of split rings and split chains.  Nothing interesting here, except that I had this sudden thought - can the diamond motif be used to make a doily?

I have not actually tatted it, but after copying and pasting the image a few times, I think it will make a rather lovely piece of doily.


What do you think?
I forgot to mention this earlier - the length of the diamond motif is about 14cm or 5.5cm using size 20 thread.  This would make quite a sizable doily.

11 May 2013

NB Edging from 8 April 1937 - revised.

I read Ladytats' comment to the earlier post and is reproduced here;

just curious, and looking at old pattern pictures is sometimes difficult, but I don't think that one set of rings in the picture are tre-foils.
On left side just above the corner is the clearest, and to me it looks like ring~ring~chain~Ring joined to prev row~ch~ring joined to previous row~ring~ch joined to prev ch and to previous ring~ch~ring~ring (which is back to the beginning of the repeat.)


I took a good look at the original picture and can see that there is a chain between the two rings that is joined to Row 2, but that part was missing from the instructions. Here is the original image which I downloaded from the site,

I tatted Row 3 again but made some changes to the stitch count in the chains.  I also added the missing link, but only guesstimated the stitch count since it was not given in the pattern.  

The one I tatted earlier is on the right, and the revised version is at the bottom.  I reduced the stitch count in the chains by 6ds, and added 9ds for the missing chain.  I also joined the 3rd chain to the 5th chain to make Row 3 a bit sturdier. I like it better this way.  

10 May 2013

NB Edging from 8 April 1937

This edging is from Norma Benporath was published on 8th April 1937 in The Queenslander.  It is another square edging, made up of three rows.

The first two rows worked out nicely, but the third row did not turn out as I would have liked, even though I had followed the pattern without making any changes to the stitch count.

The chains in Row 3 are overlapping each other, as you can see in this close-up photo.    I am not sure if blocking will straighten the chains out, but again, the overlaps could be what was intended with this design.

It is a beautiful design, but I prefer my tatting to lay as flat as possible.  If I were to tat this again, I may remove one of the chains and replace one of the rings with a split ring.

5 May 2013

NB Edging - corner done

Update on the re-working of the square edging by Norma Benporath from this Trove site, published in The Queenslander on 25th Feb 1937.

I have finished doing the corner as shown below.


In this edging, the corner is made up of a cloverleaf which is tatted through with the rest of the edging, and the flower motif is tatted later.  The corner flower motif appears a bit wobbly as it is, so I may consider suggesting that extra joins be made in the two additional chains on the left and right of it.

4 May 2013

NB Edging Part 2

This is the first repeat of the edging of the Norma Benporath pattern that I started in the previous post.

I was a bit confused when trying to determine the stitch count in the chains that form the 'stem' of the flower. Could not rely much on the picture either. This completes the first repeat of the edging.

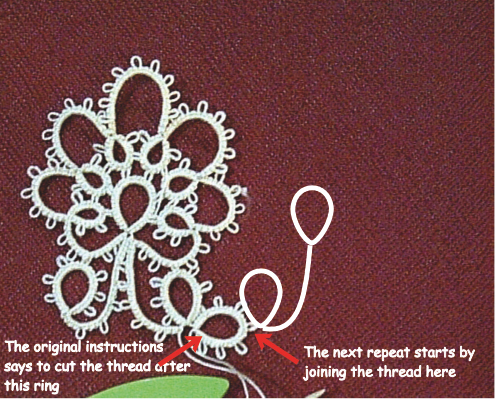
Following the instructions, I am to cut the thread at this point and re-attach the thread at the middle picot of the last ring to begin the next repeat, as illustrated below.

I think you can guess what is screaming out to me -
"Split Rings"
Here is with two repeats done, with the split ring between the two.
Next is to do the corner.

3 May 2013

NB Edging from 1937

I have not worked on any Norma Benporath's pattern for quite a long while, so I thought I should tat another one.  I picked a simple one this time. This was published in The Queenslander on 27th February 1937.  There are three designs there, two edgings and a square motif.

I started with a few rings of the square edging, following exactly as the written instruction published.  It does not look at all like  the picture in the paper.
It is too early to make any conclusions, but I can see that there should be a DNR (do not reverse) when making the 2nd ring, which is not apparent in the instructions.

I am going off now and will continue later tonight.  I think this will turn out well.

14 Oct 2012

Towel Edging and Insertions - pattern by Norma Benporath

This is the best that I can do for this pattern of Ms Benporath's, A Dainty Guest Towel in Tatting. I am quite happy with the small square insertion and the edging but struggled a bit with the large square.  After tatting a second time, the large square still did not turn out quite the way I was hoping it would, it showed some bowling.
Small square insertion
Towel Edging.  I have added a corner to the original design
Large square insertion
Round 1 of large square insertion makes a pretty motif on its own.
The chart for these will be too small for you to see if I were to post it here.  Instead I have prepared a pdf of the chart.  Please e-mail me if you would like a copy.  I am not always online, so I may only be able to e-mail it to you a day later.

14 Feb 2012

The Charm of Tatting

This Norma Benporath pattern was published in the Queenslander on 15th November 1934.  As I wrote in the earlier post, I am going in blind with this one because the scanned picture from the newspaper only shows a big black square with what look like scratches of white for the tatting part.

Surprisingly, the instructions for the first two parts were quite easy to follow and translated very well into tatting.  I didn't have much trouble with it so far.  Here is the picture of the first two sections or rounds.
Thread is size 60 Anchor, with a Clover shuttle included for size comparison of the work.
The construction thus far is slightly different from the usual. The square motifs (with the eight rings) were made first as the foundation round, followed by the round on the inside of the squares.  The original pattern was intended as an edging where a number of square motifs are made and joined together to form a big square shape.  Then the inner edging is tatted all round.  On completion of the whole piece, a piece of linen is to be sewn to fill the empty space in the centre.

But, I am not aiming for the full works and decided that I'll make a doily out of this. So, I have reduced the number of square motifs to just 4 x 3 squares and tatted the inner edging, resulting in a small empty space in the middle.  I could have tatted two square motifs to fill the middle, but I will not be able to show you the inner edging as per the pattern.  I will decide later if I want to leave the space as it is or fill it up with something or other.

The next two rounds needed a bit of thinking. I had to read the instructions for Round 4 to realise that I will need two shuttles for Round 3.  Reading the instructions, I made a sketch of Rounds 3 and 4 to make sure that I get a reasonable shape for the two rounds.
Sketch of Rounds 3 & 4

9 Feb 2012

NB Edging No. 4 again, with beads

This the Norma Benporath edging No 4 from Five Dainty Designs again, but with beads added.
Thread used is DMC Dentelle 80 #3687, finished size is slightly over 10cm diameter
This will be attached to another project which I will share in a different post later.

After a number of reasonably easy Norma Benporath patterns from the Trove, I think I am ready for another challenging one.  And this time, I think I will be going in blind.  This is the pattern that I want to attempt, The Charm of Tatting, A New Border Design.  Click on the link to see if you agree with me.

Oh dear .. have I jumped in too deep?!!!

5 Feb 2012

Five Dainty Designs - Edgings #3, #4 and #5

As I wrote earlier, the NB patterns that I have been tatting do not say when to reverse work or change shuttle, or even if two shuttles are required.  In this situation, a reasonably clear photo of the finished model is of great help.  In the case of these edgings, I found that using two shuttles greatly eased the method of construction to achieve the desired shape.

Edging No. 3 from Five Dainty Designs is an example that it can work in any which way.
Looking at the scanned photo from the newspaper, I know that two shuttles are required because there are also rings on the other side of the chains. For the 1st ring (above the chain in the pic), I reversed work after the ring at the bottom, made the 1st part of the chain, did not reverse and switch shuttle to make the ring on top of it, switch shuttle again to make the 2nd half of the chain.  The result is a smooth curve in the chain holding the ring.

For the 2nd ring, I did not reverse after the ring at the bottom but switched shuttle and made the 1st half of the chain.  Then, I reversed work and made the 2nd ring, reversed again and finished the 2nd half of the chain.You can see in the picture above that, these two different construction methods give a totally different effect to the chains attached to the single ring.

Edging No 4 is quite similar to edging No 2 in the design, except that the single rings are replaced by clovers.
Comparing the two methods of Edging No 3, I decided to go for the 2nd method of construction.  This edging also makes a pretty bookmark.

Edging No 5, is rather pretty too but, because of the width of the motif, is not suitable to be converted into a bookmark, I think.

All models are tatted with Lizbeth #40, Butterfly Breeze.

And where is Edging No 2, since there are five edgings in all?  I tatted a snippet of No 2 and found a mistake in the scanned instructions.  It was a very short piece and it got dropped somewhere before I could snap a picture of it.

22 Dec 2011

Norma Benporath pattern No. 2

After the Lace Mat Doily of the last post, my 2nd Norma Benporath project is Dainty Border For an Oval Doyley.  I will not be tatting the full doily, only sufficient repeats to be able to understand the flow of the pattern. I must say that this one was a challenge to me.

This lace edging has three rounds.  Following the instructions (edited text), Rows 1 and 2 were a breeze.  When it came to the last row, I had to think as a designer and try to figure out how it should be.  The instruction was totally off.  Where I think there would be a mirror image, one ring turned out bigger than the previous ring.  A join was missing at one point where I thought there should be one.  If you follow the link, you can see that the scan photo did not help at all.  This is what I finally worked out after the 4th try.
I started on another attempt, but this time I made some changes to replace parts that I was not happy with. I replaced the bare thread in the first row with chains. The second row have arches made up of chains with picots. When I made the clovers resting on the arches, the picots in the chains and the picots of the rings of the clover overlap each other and the design sort of got lost somewhere.  So I made the chains curve the other way which I think turned out more pleasing.
Unfortunately the scan of the 2nd try did not turn up so clearly but I hope you can see where I made it differently.

Actually, just these two rows made up a pretty edging by themselves.  And the reason for saying that is, the last row is still giving problems for me, he he he . . . .


9 Nov 2011

Still not tatting much......

.... but here is a picture of my niece wearing a tunic with tatted edgings attached to the sleeves and neckline.

4 Mar 2011

The Wedding Pt 2 & Singapore

Got all my material ready for the tatting to make the bunga rampai container to be used as part of the wedding gifts.

I made another design for the bunga rampai container.  This time I used a small cup/glass and designed an edging to surround the cup.

I tatted the same pattern for both green and purple but somehow it turned out differently when I place round the cup.  When I placed on the green one, it turned away from the cup.  Then I tatted the purple one and  place it on the cup it hugs the cup.  Now I am not sure which one looks better.  I plan to tat a smaller edging to place round the lip of the cup.  I don't have the design yet for it though, maybe I'll use the evergreen hen-and-chicks.

The thread that I will be using for this wedding project is Milford Mercer size 20 which I bought in Singapore.  I like the Milford thread because it is 6-ply. Over here, only the Cebelia has many colour choices, but thay are 3-ply and I don't really prefer tatting with 3-ply thread.  Getting the milford was not the only reason to go to Singapore, though.

Sheila, Jessica and me
I was not able to meet with Sheila when I was in the UK at the end of last year, even though I had planned to. As Sheila regularly visit Singapore, I decided to make the trip to meet her there when she wrote to say that she will be coming over. We agreed to meet in Spotlight, where I bought the Milfords.  As I also wanted to get some beads, Sheila suggested that we go to Arab Street for them.  That is where I got the green and purple beads.  I could have spent the whole day at Arab Street, if only for the beads and the findings and the notions, but that will have to be for another day.

From Arab Street we adjourned to Raffles Hotel for some tatting talk over tea.
Sheila and me at Raffles Hotel cafe chatting over tea
That was when Sheila brought out all the goodies.

Tatted hankie from Sheila
I received this pretty hankie from Sheila with tatted edging. Sheila then challenged me to produce something equal of her high quality work by giving me the pattern for the edging and a blank hankie.

Note: the tatting is not the edging for the hankie
Jessica showed a very pretty and delicate doily, about 10 inches wide, made with size 80 thread which I forgot to take a picture of.  I was ashamed to admit to both of them that I don't tat with size 80 much. Then there are these wonderful books by Pam Palmer.

Tatting Treats and Festive Elephants by Pam Palmer
That was one happy tatter who returned home that day, he he he ....

And happier still when, on the next day,  the postie delivered my pop-a-bobbin shuttle that I had ordered from Jane.  This one is in ebony.  This new pop-a-bobbin is slightly slimmer in size that the earlier one that I bought.  I like the new size better.

1 Apr 2010

Frivolity

Another attempt with the front/back side tatting?  No, not really.
What about right/left hand tatting? Because that was what I did to get this short strip of tatting.
That's right.  The top row was tatted right-handed (right hand holding the shuttle) and the bottom row was made left-handed. The result is like front/back side tatting.

Now, why would I do something like that?  For no other reason other than being silly, that's why.

I have to say that it was difficult at the beginning.  My fingers on the right hand struggled to control the thread from slipping off.  Balancing the tension of the shuttle thread and the finger thread as I slide the first half-stitch to the pinch was a struggle.  I couldn't move the finger pinch forward as the double-stitches are formed because when I do the loop just slipped off the fingers.  Almost butchered the picots in the process of making the joins.
But, I did it!!!

Okay, enough of the frivolousness. Let's look at the real frivolité
This looks like the traditional one-shuttle edging in the first picture but not quite the same.  I think it looks pretty quaint.

29 Aug 2008

The Relay Quartet

You may think that the motif here looks very odd. You are right. I am working on another edging and was trying out different shapes for the corner. Rather than cutting the thread each time and starting again, I made four corners at one go. You may not be able to see the edging well because I only make one repeat of the motif for each side.


Okay, let me take you through it.

I started with the one in the bottom left. There isn't really a corner in it - looks like it got chopped off.

The second one, bottom right, is more interesting. I'll call this a filled corner because the actual corner was made later. The first part is like corner #1 except for the addition of the two rings off the chains. The other part of the corner is made later by adding additional rings and chains to it.

#3, top right, is similar to the first part of corner #2, except that one of the rings in the corner is a mock ring, needed to make the third ring in the 3-rings grouping.

This quartet didn't actually make to the end because I dropped the baton after the third corner, oops .... (excuse the pun even though it is intended, LOL) .... I mean the thread ran out of both shuttles. I cheated and quickly loaded the shuttles, before the officials realised what happened, shhhhh ....

I finished off the last corner, #4 in the top left. You can see that I have run out of ideas for corner #4 and just added a ring in between the two chains.

No medals for guessing which one I finally chose, although I would have liked to be able to make it in one pass. This design is now called the Sweetheart Edging


Note : The pattern for Heart o' Daisy has been added to the Patterns Page.

26 Aug 2008

Old edging with a Turn

This is a common edging pattern that I see often. A good start for learning tatting with two shuttles.

And most times the pattern only give instructions for a straight edging. Well, I have given it a turn, as you can see in the small tatted sample below.


I have designed a corner for it, my way. The instruction for my version of the corner is here.

Facing Rings Edging with a Corner Added

The pattern for this common design is often shown without the instructions for making a corner.
I have designed my version of a corner. . . . .


. . . . and the instructions on how to make it.

Uses two shuttles, starting along the straight edge.


R(3-3-3-3), reverse work (RW).
Switch Shuttles (SS), R(3-3-3-3), do not reverse (DNR).
(*) SS, C(4) DNR.
R(3+3-3-3) join to last picot of adjacent ring (first ring made), RW.
SS, R(3+3-3-3), join to last picot of adjacent ring (2nd ring made), DNR.

Repeat from (*) until ready to make the corner, as follows;
After completing the last pair of the facing rings, make C(3), RW.
R(3+3-3-3-3-3) join to the last picot of the adjacent ring, RW.
C(3+), lock join to the inside ring of the the last pair of rings before the turn, RW.
R(3+3-3-3) join to the last picot of the ring in the corner, DNR.

Repeat from (*) until ready to make the next corner.


22 Aug 2008

Dimpled Chain Edging

This edging is made up entirely of chains .. with a dimple in each one of them!


sp - small picot
vsp - very small picot
RW - reverse work
DNR - do not reverse
SLT - shoe lace trick

The pattern
Wind a shuttle from a ball CTM

The straight side
1. Start with a picot at the beginning of the first chain. I used a paperclip to hold the thread for a mock picot. C(6 sp 3-3 sp 5+3-3 sp-6+), where
1st join is to the previous sp of the chain;
2nd join to the mock picot left after the paperclip is removed from the chain. RW and SLT.
2. * C(3-3 sp 5+3-2), join to the sp of the same chain. RW and SLT.
3. Make a downward facing picot at the beginning of the next chain.
4. # C(5+3-3 sp 5+3-3 sp 6+),
1st join to the sp of the previous dimpled chain; 2nd join to the sp picot of the same chain; 3rd join to the downward picot at the beginning of the chain. RW and SLT.

Repeat from * for the length of the straight side.

The corner
5. After #, make C(3-3 sp 5+3 vsp 3). RW and SLT.
6. Make a downward picot at the beginning of the next chain, followed by (6+3-3 sp 5+3-3 sp 6+). Joining as in Step 4. DNR.
7. C(6+3-3 sp 5+3-3 sp 6+), 1st and 2nd join as in Step 4; 3rd join to the same downward picot joined earlier. RW and SLT.
8. C(3+3 sp 5+3-3), 1st join to the adjacent vsp; 2nd join to the sp of the same chain. RW and SLT.

Continue from # for the straight side until you are ready to make the next corner.

Additional Note
If you study the chart, you'll realise that this edging can also be tatted up similar to making the standard ring-and-chain, except that now the rings and chains have dimples in them.

But, I don't fancy the idea of having to close loads of dimpled rings. Working with chains are whole lot easier because I don't have to worry about closing any rings. For those who want to try it that way, Jane Eb has drawn up a neat method on how to close dimpled rings.

Please test out the pattern for me and point out any corrections that needs to be done. I got confused myself when writing this out, especially with the RWs and the SLTs.


A Row of Crowns

Another edging design with the corner included.....


... and the diagram.....


I couldn't pick a name for this edging at first. It looks like a series of crowns. Looking at it again, it appears like scared faces with the hair all standing up! Some have even suggested that each repeat look like a frog!

But I'm going with my first instinct and call it A Row of Crowns

A little explanation about the chart -

1. Make the third picot in the R(3-3-3-3-3-3-3) small.

2. The ring shown in blue/green at the corner is a SCMR. After making (4+4..) of the SCMR, switch shuttle and make the clover. Resume the SCMR with another 4ds and close. Using SCMR allows you to make the corner in one pass.

3. If you do not wish to use the SCMR, ignore that part when you make the corner. Instead make the chain as (8-4) for the first repeat at the turn. When you have completed the round for the edging, go back to each corner and fill it in. With shuttle only, make the clovers as in the diagram. Then, make the fourth ring R(4+4+4), joining to the picot in each chain at the corner. Cut and join to the base of the clover.


Muskaan M's DAL (Design Along)

I accepted the challenge by Muskaan M inviting tatters to join her Design Along (DAL) where she posted the design for the first two rounds a...

Many liked this from earlier