Sometimes, when an idea comes, you just have to get started on it even though there are already other WIPs waiting to be completed. Do you do that sometimes?
Well it happens quite often with me. But, a tatter needs to tat, ha ha ha ........
So, I started on a new project, in the midst of preparing for Eid-ul-Fitr which is coming in a couple more days, besides having other things to do as well. I am thinking of an oval doily and as I start I can straightaway see the making of a simple bookmark which I am sharing here.
I started with a row of split rings in the centre followed by the basic rings and chains for the first round. This would be a good exercise for beginners to get familiar with tatting split rings. A chart with an explanation of the stitch count is given below.
You can make the split rings in the centre to any length you like.
Showing posts with label split rings. Show all posts
7 Aug 2013
20 Jul 2011
Rose Window
Another snowflake design.
This is a two-shuttles pattern worked in three rounds. I utilised a split ring in the pattern to jump out from the centre ring. The rounds in the charts are show in Yellow – Rnd 1, Green – Rnd 2 and Blue – Rnd 3.
R(2-2-2-2-2-2-2-2-2-2-2-2), make each picot about 6mm long (when open) if using size 40 thread.
SR(4-2/4-2). Make sure to leave a distance of about the length of the picot of the centre ring before making the split ring.
Make the ring on the right side of the split ring as,
R(2+[p of the SR]4-6), completing the cloverleaf.
Flip the work over and make the ring on the other side of the SR, working on RODS,
R(2+[p of the SR]4-6).
Flip back to the front and reverse work.
(*) C(6-6), rw
R(6+[p of right ring of cloverleaf]6), rw.
C(6-6), rw.
Make the next cloverleaf,
R(6+[p of pr ring]4-2), R(2+[p of pr ring]4+[skip one p, join to next p of centre ring]4-2), R(2+[p of pr ring]4-6). Rw.
Repeat from (*) to finish this round. Cut and tie to beginning cloverleaf.
Round 2 – two shuttles
Join thread to any chain after the ring of (6-6) of Round 1. Begin with a chain.
C(3-3 +[lj to p of next ch of Rnd 1] vsp 8 +[lj to base of ring of Rnd 1]), dnr.
(§) Switch shuttle (SS), Jk(10), dnr.
SS, C(8 +[lj to p of next chain of Rnd 1] vsp 3-3 +[lj to p of next ch of Rnd 1] vsp 8 +[lj to base of next ring of Rnd 1]), dnr.
Repeat from (§) to finish this round, ending with a lock join to the beginning chain.
DO NOT CUT thread, continue with Round 3
Round 3
C(5-5 +[lj to vsp of Rnd 2]7-3), dnr.
(δ) SS, R(3+[p of pr chain]5-5-3), R(3+[p of pr ring]2-2-2-2-2-3), R(3+[p of pr ring]5-5-3), dnr.
SS, C(3+[p of pr ring]7 +[lj to next vsp of Rnd 2]5-5+[lj to next vsp of Rnd 2]7-3), dnr.
Repeat from (δ) to finish the round.
Cut thread, join to the beginning and hide ends.
![]() |
| Model is tatted in size 40, size is 7cm across (point to point) |
Round 1
Begin in the centre with,R(2-2-2-2-2-2-2-2-2-2-2-2), make each picot about 6mm long (when open) if using size 40 thread.
SR(4-2/4-2). Make sure to leave a distance of about the length of the picot of the centre ring before making the split ring.
Make the ring on the right side of the split ring as,
R(2+[p of the SR]4-6), completing the cloverleaf.
Flip the work over and make the ring on the other side of the SR, working on RODS,
R(2+[p of the SR]4-6).
Flip back to the front and reverse work.
(*) C(6-6), rw
R(6+[p of right ring of cloverleaf]6), rw.
C(6-6), rw.
Make the next cloverleaf,
R(6+[p of pr ring]4-2), R(2+[p of pr ring]4+[skip one p, join to next p of centre ring]4-2), R(2+[p of pr ring]4-6). Rw.
Repeat from (*) to finish this round. Cut and tie to beginning cloverleaf.
Round 2 – two shuttles
Join thread to any chain after the ring of (6-6) of Round 1. Begin with a chain.
C(3-3 +[lj to p of next ch of Rnd 1] vsp 8 +[lj to base of ring of Rnd 1]), dnr.
(§) Switch shuttle (SS), Jk(10), dnr.
SS, C(8 +[lj to p of next chain of Rnd 1] vsp 3-3 +[lj to p of next ch of Rnd 1] vsp 8 +[lj to base of next ring of Rnd 1]), dnr.
Repeat from (§) to finish this round, ending with a lock join to the beginning chain.
DO NOT CUT thread, continue with Round 3
Round 3
C(5-5 +[lj to vsp of Rnd 2]7-3), dnr.
(δ) SS, R(3+[p of pr chain]5-5-3), R(3+[p of pr ring]2-2-2-2-2-3), R(3+[p of pr ring]5-5-3), dnr.
SS, C(3+[p of pr ring]7 +[lj to next vsp of Rnd 2]5-5+[lj to next vsp of Rnd 2]7-3), dnr.
Repeat from (δ) to finish the round.
Cut thread, join to the beginning and hide ends.
19 Jun 2010
Flutters
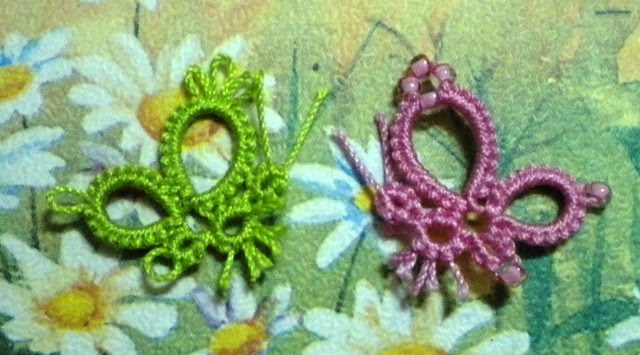
This is a simple butterfly pattern that you can make with that little bit of thread left from a project.
Most butterfly patterns available show the four wings, but these are shown in profile. Just something different from the usual ones.
Each butterfly takes up about 90cm (3ft) of thread, uses shuttle only (no ball thread), contains rings and split rings, and a little bit of finger tatting. The finished size measured about 2cm from the tip of the upper wing to the tip of the lower ring.
Start the first ring about 10cm (4 inches) from the beginning of the thread.
Begin with the big wing of the butterfly,
R1(11-1-1-9-2). Make the picots graduated picots.
R2(2+[to last picot of R1]8-10)
R3(3-3)
The next two rings are split rings. For the split rings, finger tat the second half of the split rings using the 10cm thread that was left at the beginning.
Split ring SR1(3-1-1-1/3).
Split ring SR2(3/3).
Cut off the threads to required length to make the feelers. Snip off the picots in SR1 to make the legs.
If adding beads to the butterfly, you need 6 beads on the thread. Make rings 1, 2 and 3 as follows.
R1(12[3b:1b]10-2), where [3b:1b] means 3 beads from the loop thread round the fingers, and 1 bead on the shuttle thread.
R2(2+8[1b]10
R3(3[1b]3)
Happy Tatting
Most butterfly patterns available show the four wings, but these are shown in profile. Just something different from the usual ones.
Each butterfly takes up about 90cm (3ft) of thread, uses shuttle only (no ball thread), contains rings and split rings, and a little bit of finger tatting. The finished size measured about 2cm from the tip of the upper wing to the tip of the lower ring.
Start the first ring about 10cm (4 inches) from the beginning of the thread.
Begin with the big wing of the butterfly,
R1(11-1-1-9-2). Make the picots graduated picots.
R2(2+[to last picot of R1]8-10)
R3(3-3)
The next two rings are split rings. For the split rings, finger tat the second half of the split rings using the 10cm thread that was left at the beginning.
Split ring SR1(3-1-1-1/3).
Split ring SR2(3/3).
Cut off the threads to required length to make the feelers. Snip off the picots in SR1 to make the legs.
If adding beads to the butterfly, you need 6 beads on the thread. Make rings 1, 2 and 3 as follows.
R1(12[3b:1b]10-2), where [3b:1b] means 3 beads from the loop thread round the fingers, and 1 bead on the shuttle thread.
R2(2+8[1b]10
R3(3[1b]3)
Happy Tatting
24 Feb 2010
Dragonfly and Swan
These two motifs are quite fast to tat up and doesn't take much thread. They are useful for emptying shuttles when you need them to start on a new project.
Since they are quite simple designs, there is the possibility that someone has thought of the patten already, but I have come up with these on my own without referring to any other patterns that may have been done before.
I am giving the patterns in chart form with a little explanation along the side. If you need any help with them, please e-mail me.
This pattern is made with one shuttle with a little finger tatting. I have added beads in the chart but you can replace them with picots.
Leave a tail of about 20cm and make the first ring at the tail-end of the dragongfly, i.e. the ring R(5-5) and proceed with the split rings, followed by the wings on the left side of the chart .
The lower wings are joined to the 2nd split ring of the lower part of the body. The upper wings are joined to the head of the dragonfly.
Male a long picot in the ring for the head which is then cut to form the feelers.
The pattern ends with the lower wing on the right side of the chart. Cut and hide the ends.
If you don't like ends, you can try this alternative.
You need about 150cm of thread for this. Start in the middle of the thread, i.e. 75cm on each side.
Make the first ring at the tail end. followed by the split rings. Use one side of the thread to make the wings on the left side, and the other thread to make the right wings. For the right side, make the double stitches in reverse order, i.e. the second half of the stitch first. Finish with a split ring for the head, close the ring and cut off the thread with enough length for the feelers.
I have since found out that dragonflies don't have feelers/antennae. They have stubs at the top of the head for eyes. So, instead of making a long picot you make a regular ring with 2ds separating the beads instead.
Swan
After closing the second ring of the body, make a shoe-lace knot (SLT) to change the position of the thread left at the beginning. Using this thread as a ball, make the neck of the swan, joining to the body as shown in the chart.
Make a split ring for the head and cut off the ends leaving just enough for the beak.
10 Feb 2010
Enchanter
My Valentine gift to you this year
I know there are still a few days more, but if you are still searching for hearts to tat, you may want to try this.
The chart is below
Load two shuttles CTM.
Begin with the dimpled ring (DR) in the centre of the heart with the stitch count of
DR(7-7-7sp7+[to the sp]7-7-7)
Then, make a split ring SR(2-2-2-2/2-2-2-2).
Rotate work so that the dimpled ring is now pointing downwards.
R(6-6)
Switch Shuttle (SS), C(12) and reverse work (rw).
R(4-4+[to the first picot of the DR]4-4), rw.
C(10), rw.
R(4-4+[to the 2nd picot of the DR]8), rw.
C(2-2-2-2-2-2-2-2), rw.
R(8+[to the picot of the DR joined earlier]4-4), rw.
C(8), rw.
R(4+[to the sp join of the DR]4), rw.
C(8), rw.
R(4-4+[to the 4th picot of the DR]8), rw.
C(2-2-2-2-2-2-2-2), rw.
R(8+[to the picot of the DR joined earlier]4-4), rw.
C(10), rw.
R(4-4+[to the last picot of the DR]4-4), rw.
C(12)
Leave a tail of about four inches of thread from each shuttle before cutting. Tie the ends to the space between the split ring and the floating ring.
Tie the ends into a bow. Isn't that great - no ends to hide.
Begin with the dimpled ring (DR) in the centre of the heart with the stitch count of
DR(7-7-7sp7+[to the sp]7-7-7)
Then, make a split ring SR(2-2-2-2/2-2-2-2).
Rotate work so that the dimpled ring is now pointing downwards.
R(6-6)
Switch Shuttle (SS), C(12) and reverse work (rw).
R(4-4+[to the first picot of the DR]4-4), rw.
C(10), rw.
R(4-4+[to the 2nd picot of the DR]8), rw.
C(2-2-2-2-2-2-2-2), rw.
R(8+[to the picot of the DR joined earlier]4-4), rw.
C(8), rw.
R(4+[to the sp join of the DR]4), rw.
C(8), rw.
R(4-4+[to the 4th picot of the DR]8), rw.
C(2-2-2-2-2-2-2-2), rw.
R(8+[to the picot of the DR joined earlier]4-4), rw.
C(10), rw.
R(4-4+[to the last picot of the DR]4-4), rw.
C(12)
Leave a tail of about four inches of thread from each shuttle before cutting. Tie the ends to the space between the split ring and the floating ring.
Tie the ends into a bow. Isn't that great - no ends to hide.
22 Jan 2010
Chinese Coin Bookmark
This is quite an easy bookmark to make, but you will need to know how to make split rings. I call this the Chinese Coin bookmark because the shape of the individual repeat is like an ancient Chinese coin. Click here to find out about the different type of Chinese coins that were once used in China.I find this design interesting because it can be made in two ways. You can either make individual motif and join them up, or in one pass. It can be a very colourful piece if the individual motifs are made in different colours.
Click on this link Chinese Coin Bookmark for the pdf file of the pattern.
The two charts for the bookmark has been added below.
This is the chart for making the bookmark in individual motifs joined together. The rings shown in green are split rings with the stitch count of SR(4-4/4-4).
This chart on the right is for making it in one pass.Here, the left side of the bookmark is made first. When you reach the length that you require, make a turn at the end and continue with the right side.
The rings shown in pink are split rings with the stitch count of SR(4-4-4/4).
Another ooopsy ...
If you had downloaded the file earlier, there is a mistake in the stitch count for the split rings marked in blue in the second chart.
The rings shown in pink and blue should have the same stitch count, i.e SR(4-4-4/4).
The chart should look like the one in the blog post here.
I have amended the chart in the pdf file to show the correction.
Subscribe to:
Posts (Atom)
Tetradill - a square motif
I was travelling in Xi'an, China and saw designs of pavement tiles that I like. This design was inspired by one of the tiles. The photo...
Many liked this from earlier
-
This doily was first posted in my Facebook page as a tat-along. Thread: Olympus Gold Special, 2 balls. Tools: Shuttle, 2 shuttles ...
-
I hope this tutorial can help beginners to shuttle tatting get the basics of tatting, i.e making the ring, chain and a join. To prepare for...