Quietly Tatting
Not much tatting done - but I have this to share -
Everyone would recognise this simple single-shuttle edging design,

Most times, the pattern for this design is shown as a straight edging. It is left to the tatter to figure out how to incorporate a corner into it.
However, in general, there are designers who have included the steps for corners in edging patterns. One that quickly comes to mind is Mary Konior.
Anyway, I'd like to share my version of the corner for this edging -

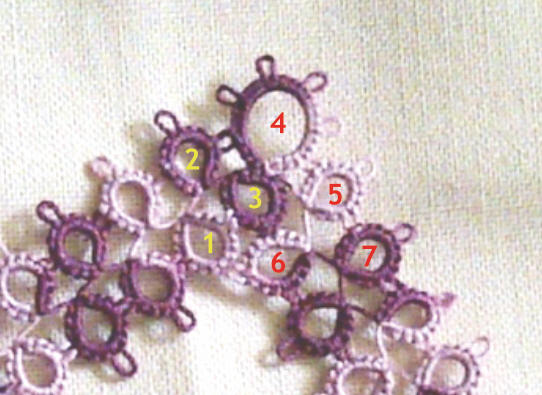
This larger picture shows how I made the corner.

The rings are all 4-4-4-4 stitch count, except for Ring 4, which has 6 picots separated by 4ds. The numbers give the sequence for making the rings at the corner.
Everyone would recognise this simple single-shuttle edging design,

Most times, the pattern for this design is shown as a straight edging. It is left to the tatter to figure out how to incorporate a corner into it.
However, in general, there are designers who have included the steps for corners in edging patterns. One that quickly comes to mind is Mary Konior.
Anyway, I'd like to share my version of the corner for this edging -

This larger picture shows how I made the corner.
The rings are all 4-4-4-4 stitch count, except for Ring 4, which has 6 picots separated by 4ds. The numbers give the sequence for making the rings at the corner.
- Tat the Rings 1, 2 and 3 as usual, followed by Ring 4.
- Before making Ring 5, do a lock join to the last picot of Ring 3, followed by Ring 5.
- Reverse and tat Ring 6, joining to picot of Ring 3, followed by another join to picot of Ring 1 and finish off the rest of the ring.
- Continue with the rest of the straight side from Ring 7 onwards.
Way cool! I love how the colors pooled.
ReplyDeleteGreat edging and I like the corner, simple but neat and looks easy to do, thank for sharing your idea and pattern
ReplyDeleteMargaret
Nice! I think corners are the hardest part of edgings. Thanks for showing us how to make this one! :)
ReplyDeleteA very neat way of turning the corner, thanks.
ReplyDeleteVery nice!! :)
ReplyDeleteClean, neat, and attractive. Thank you for sharing. Karen in OR
ReplyDeleteNice corner I like what you did and sharing the how to.you always do such nice work.
ReplyDelete