Update of the NB Doily (closing large rings)
This is an update of the Norma Benporath doily (doily no.2 in this post here).
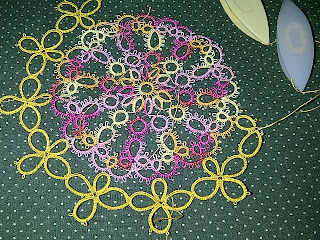
As I wrote there, I had to cut off the yellow part of the doily because of the reasons stated. After being distracted with some other tatting project, I picked it up again and re-tat that round.
This particular round is made up of individual 4-rings clovers. The rings are huge with two having 45 ds each, (the actual pattern has 54 ds). The smallest ring has is 33 ds which is quite manageable. But for large rings, they do cause some problems when closing. .
Each of the 4-rings clovers is tatted and joined to the previous round individually. I don't like the thought of hiding 12 pairs of ends, so I used split rings to go to the next set of rings. After, working this round, I think I have the issue of large rings down pat. This is how I do it;
My usual problem would be, the ring thread becomes all twisted as it grew smaller and end up in a knot. What I try to do is to minimise this.
Before I loop the thread round my fingers, I let the shuttle hang to straighten any twist already in the thread.
Then, every 10 or so double stitches, I let it hang again to remove new twist that occurs as the knots are made.
After the last ds is made, I smoothen out the ds, form the shape of a ring and bring the last ds close to the first ds.
I hold the shape of the ring between my thumb and two fingers and start to pull the shuttle thread to close the ring. When there is only about one cm left of the loop, I hold the shuttle thread closer to the ring and start pulling it in a circular motion clockwise.
Following this method, I did not get much twist in the loop thread and the rings close quite smoothly.
Round 4 needs a bit of thinking because it is another round of individual pieces and I want to see if it can be done continuously.
Added later:
I had a feeling that I should not be too eager to start on Round 3, and I was right. As soon as I read the instructions for the second ring of the next round (Round 4), I realised that I should have done Round 3 differently. So, whatever that I have tatted as shown in the pic above will be cut off and I will start again.
As I wrote there, I had to cut off the yellow part of the doily because of the reasons stated. After being distracted with some other tatting project, I picked it up again and re-tat that round.
This particular round is made up of individual 4-rings clovers. The rings are huge with two having 45 ds each, (the actual pattern has 54 ds). The smallest ring has is 33 ds which is quite manageable. But for large rings, they do cause some problems when closing. .

Each of the 4-rings clovers is tatted and joined to the previous round individually. I don't like the thought of hiding 12 pairs of ends, so I used split rings to go to the next set of rings. After, working this round, I think I have the issue of large rings down pat. This is how I do it;
My usual problem would be, the ring thread becomes all twisted as it grew smaller and end up in a knot. What I try to do is to minimise this.
Before I loop the thread round my fingers, I let the shuttle hang to straighten any twist already in the thread.
Then, every 10 or so double stitches, I let it hang again to remove new twist that occurs as the knots are made.
After the last ds is made, I smoothen out the ds, form the shape of a ring and bring the last ds close to the first ds.
I hold the shape of the ring between my thumb and two fingers and start to pull the shuttle thread to close the ring. When there is only about one cm left of the loop, I hold the shuttle thread closer to the ring and start pulling it in a circular motion clockwise.
Following this method, I did not get much twist in the loop thread and the rings close quite smoothly.
 |
| Round 3 started |
Added later:
I had a feeling that I should not be too eager to start on Round 3, and I was right. As soon as I read the instructions for the second ring of the next round (Round 4), I realised that I should have done Round 3 differently. So, whatever that I have tatted as shown in the pic above will be cut off and I will start again.
Thank you for the great directions on closing a big ring, they make perfect sense. The second doily is especially lovely!
ReplyDeleteI looked at the yellow row and the size of the rings and thought wow, they are so big compared with the small dinty middle. Now I can see the next row coming on, I am wondering what the last row will be. I don't have a copy of the pattern but it's looks from what you have done its going to be a large doily (cloth)
ReplyDeleteMargaret
This piece that I am working on, or attempting to, is called A Versatile Tatting Design . Click on the link to view the full design.
DeleteYour doily is looking really beautiful!! :)
ReplyDeleteYou are a patient woman! This is so fiddly and those large rings are so demanding of attention to close. You are doing a fantastic job of this old pattern...
ReplyDeleteFox : )
Hold you thoughts Fox. If you look at the pattern, you'll know that there is still a long way to go. Thank you for the encouragement.
DeleteHi, Jon,
DeleteActually I have been following your progress with this from the first and have spent some time studying the original pattern which I had downloaded and then booted off my computer!
That is just not what I need to tat at this time! The last comments about the large rings and the difficulty closing them gave me goosebumps! Not my favourite tatting situation. You are doing a super job. I am so impressed.
I'll be back!!!
xxoox Fox : )
Amazing progress. I want to tackle one of the smaller "all tatting" doilies. Glad to see this. I'm a bit behind in following your blog. I'm trying to figure out how to get NB patterns to show up at Craftree. I think it needs to start with a contemporary photo like yours. Maybe I'll just do some of her unique edgings.
ReplyDelete