Raised Beads in Tatting
I was working with some beads and chanced upon this method of using beads. I don't know if anyone had used it before but I am sharing it here anyway. This works for joining picots only. Sorry for the quality of the photos.

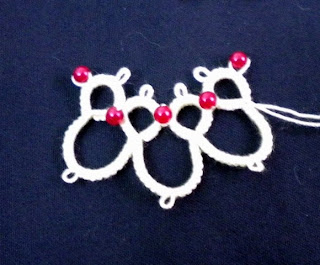
 When making a join to this beaded picot, pull the joining thread as usual when making a join. It can be an up join or a down join. It works both ways. I am used to making down joins.
 When closing the join, make sure that the bead is in the centre of the loop of the join. Close the join fully and continue with the next set of double-stitches as per the pattern.


It raised (pun intended) some interesting ideas for front/back side tatting. Here you will get a flat back side, which would be applicable when making tatting bracelets or chokers or pendants.

Add the beads to where you are going to make the joining picots, following the pattern. Make the beaded picot loose, i.e. don't pull it close to the double stitches


This method gives a raised effect in the beads when added to tatting

The view of the front side with the beads

...... and the back side without the beads showing.
It raised (pun intended) some interesting ideas for front/back side tatting. Here you will get a flat back side, which would be applicable when making tatting bracelets or chokers or pendants.
Very cool, Jon. I think I'll give it try.
ReplyDeleteHi, Jon,
ReplyDeleteIntresting that you posted this now. If you read down toward the bottom of the tat-ology post,
Thursday, July 1, 2010
New York Secret Is Out!
you will see a square motif repeated, in a collage, one square with beads and another without.
The one with the 4 beads in each corner I tatted using that very method! I didn't know if I was doing something new or re-inventing the wheel, but I had not read about this before, and didn't know how else to get those beads in the middle!
You know - necessity being the mother of invention and all that!
Fox : )
I have never thought of doing it that way, its a great idea. I do something similar but I don't put the bead on the picot- I put the bead on the loop. I pull the loop through the picot, add the bead to the loop and then pull my shuttle through the loop like a regular join. When you tighten up the bead sits on top. This also works with lock joins. I like your way because it seems less fussy, no worrying about hole sizes and crochet hooks.
ReplyDeleteHow very clever! Another thing I want to try...
ReplyDeleteI do that, although I didn't think of it as something different. I just want my beads to all show symetrically on the same side. Actually, I would just pop them through if I missed making sure they were up when I tatted. Yours look incredibly neat here though. LOL! Maybe I should be more deliberate.
ReplyDeleteYes, I'll try this technique too!
ReplyDeleteWonderful work!
A wonderful technique to make beading easier!
ReplyDeleteGreat idea, thanks.
ReplyDelete