Drawing Templates for Tatting Diagrams
This is not a tutorial about using any drawing program or software to draw tatting diagrams. The following are more like tips and hints on how to make the drawing process easier and faster. I am not focusing on any particular program or software. You can do it with what ever program that you have. I think most have the basic functions that will allow you to do it.
Okay, here goes ...
The basic component of a tatting diagram is the ring. The most basic shape would be an oval, but we all know that the ring is not really a circle nor is it an oval. It most cases it is slightly pointy as the one shown on the right. Your can play around with your drawing until you get that shape of ring that you are happy with, and save it.

Basically, that is the only shape that you need to pay attention to at the beginning. This one shape can be enlarged, reduced, group, ungroup, rotated, flipped or copied how many number of times that you need to finish the drawing.
From this one shape, you can derive the


Once you have all these shapes drawn, save each one of them. They are now templates of the basic tatting designs that can be used on its own or as a group to form a bigger design. You just need to pull up any one of these templates and save the trouble of drawing it from the start all over again.
What I do is save all these templates as a file named 'template' (what else). Each time I want to start a new design, I open this template file and then "save as" a new file of the design that I am going to work on.


Let us try and design something by using only half of the 10-rings medallion shape shown above, like this

Now, let us play around with this 5-rings curved design together with the 4-rings square. Copy, paste and rotate the 5-rings curve by 45 deg, and arrange it around the 4-ring square to get something like this design,

Copy and paste this four times, and you will get another layout of rings.

Now, let us remove some parts of this latest diagram and see what we get. I have removed the outlying rings and only kept the ones in the middle and kept two rings out of the 4-rings square in each corner. Then I fill up the blank space in the middle with the 4-rings square.

I reduced the size of the 4-rings square to bring the whole look into proportion. Next is to add in the chains. Looking good! I can see a tat-able square motif taking shape.

Copy and paste this a few times to see a bigger picture, and we have designed a square mat.

Okay, here goes ...
The basic component of a tatting diagram is the ring. The most basic shape would be an oval, but we all know that the ring is not really a circle nor is it an oval. It most cases it is slightly pointy as the one shown on the right. Your can play around with your drawing until you get that shape of ring that you are happy with, and save it.

Basically, that is the only shape that you need to pay attention to at the beginning. This one shape can be enlarged, reduced, group, ungroup, rotated, flipped or copied how many number of times that you need to finish the drawing.
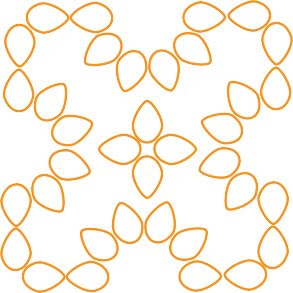
From this one shape, you can derive the
Trefoil or clover-leaf,

The daisy or flower shape,

or the 4-rings square

And you can position them anyway you like such as,


Once you have all these shapes drawn, save each one of them. They are now templates of the basic tatting designs that can be used on its own or as a group to form a bigger design. You just need to pull up any one of these templates and save the trouble of drawing it from the start all over again.
What I do is save all these templates as a file named 'template' (what else). Each time I want to start a new design, I open this template file and then "save as" a new file of the design that I am going to work on.
An example is this beginning of a motif made up of a trefoil, copied six times and rotated in increments of 60 degrees to form a circular arrangement,

or this round medallion which is really a ring copied 10 times and rotated at 36 deg,

Let us try and design something by using only half of the 10-rings medallion shape shown above, like this

Now, let us play around with this 5-rings curved design together with the 4-rings square. Copy, paste and rotate the 5-rings curve by 45 deg, and arrange it around the 4-ring square to get something like this design,

Copy and paste this four times, and you will get another layout of rings.

Now, let us remove some parts of this latest diagram and see what we get. I have removed the outlying rings and only kept the ones in the middle and kept two rings out of the 4-rings square in each corner. Then I fill up the blank space in the middle with the 4-rings square.
I reduced the size of the 4-rings square to bring the whole look into proportion. Next is to add in the chains. Looking good! I can see a tat-able square motif taking shape.

Copy and paste this a few times to see a bigger picture, and we have designed a square mat.

Thank you for taking the time to explain all this. This is very useful!
ReplyDeleteVery cleverly done, Jon. How many of those examples have you tatted? :) Drawing patterns is really fun, isn't it?
ReplyDeleteGreat advice. Thanks! I never thought of having templates of basic motifs like that. I will have to get right on that, it will greatly enhance my designing possibilities!
ReplyDeleteI like to have one template file and keep samples of various things in there. Some of the things I use a lot are an enlarged double stitch (a la Jane Eborall), cluny shape, and rings covered in double stitches for close-ups.
Thanks for the lesson in creativity! :)
ReplyDeletefantastic tutorial, thank you. I was wondering how to write down my patterns too :))
ReplyDeleteCreativity has no limits..thanks for sharing your techniques!
ReplyDeleteVery nifty! Thank you for this info.
ReplyDeleteThis is an incredible post! You put a lot of work into it! I was having difficulty with the placement of the chains, but did find software which made that much easier. But I never thought of using a teardrop shape for the rings. It does make more sense. Thanks so much for sharing this!
ReplyDeleteMany thanks for this wonderful information..it will be most helpful when I try to design...I never thought of saving the templates.
ReplyDeleteHugs
Joy in OZ
That is brilliant, thanks for doing this. It was worth your effort.
ReplyDeleteThank you so much for sharing, it's very helpful for me,
ReplyDeletePearl
Very nice I could use these tips, very kind of you!
ReplyDeleteThanks you very much for posting these templates.
ReplyDeleteRegards,
Creately
Thanks! This has helped me tremendously!
ReplyDelete