24 Dec 2020

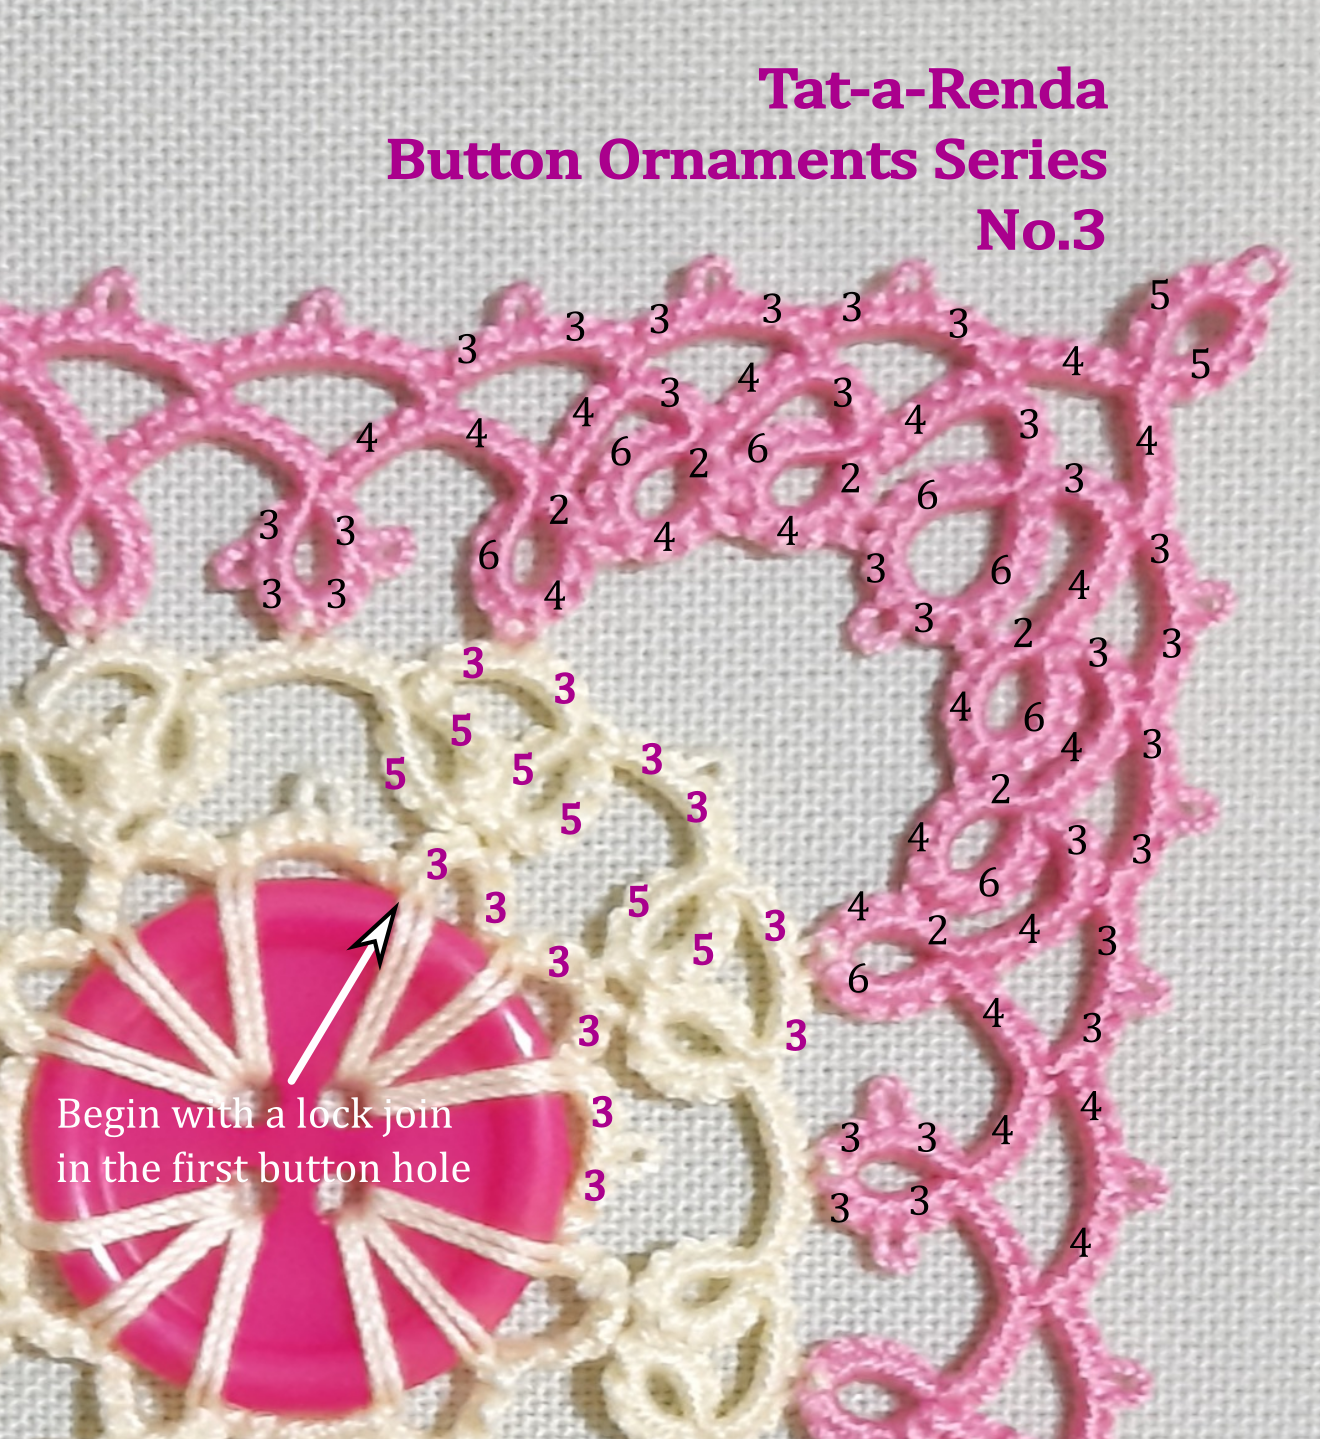
Button Ornament Series No. 3

Thia time, I am using a button for No. 3 and making a square.


  1. The button is 2.2cm
  2. The thread is Olympus Gold Special.
  3. This design is made up of four rounds.
    1. All rounds are tatted with shuttle and ball.
    2. Round 1 are all chains attached to the button with lock joins, three joins to a button hole.
    3. Each ring at the four outer corners are SCMR (self-closing mock rings). Click on the link for a video tutorial for SCMR if you are not familiar with the technique.


23 Dec 2020

JS Doily 1 Update

Tatting the button ornaments is taking some time away from my Jan Stawasz's Doily 1.  I don't really mind that because the doily is a long-term project which I consider as something to fill my time when I am not creating new designs.


I am in the middle of Round 9 and it is now 38cm wide. I couldn't get a nice picture of the full doily so here is part of it.

I have also been crocheting during this pandemic.  I started on a Scheepjees CAL by Christina of the blog A Spoonful of Yarn called d'Histoire Naturelle. I decided to do the CAL to use up my yarn stash and stop when the yarn stash run out.  And it did before I completed the CAL.

There were six parts of the CAL. I managed to reach Part 6, but I had to omit some rounds to finish off mine.  Here is the photo of my final lap-rug, measuring 96cm square. The full size would have about 10cm more to it if I had had enough yarn.


I am very happy with this even though I was not able to do all the rounds.

21 Dec 2020

Button Ornaments No. 2

This is the second button ornament, of what I hope will be a series of designs.


19 Dec 2020

Ferris Wheel Ornaments

 Facebook tatting community has be bedazzled by ornaments tatted with buttons as the main focus, thanks to Diane, the Lace-loving Librarian who kick-started it. I couldn't resist and had to join in.

Even though the main focus is buttons, I just had to try it with something different.

I have a lot of flat disks with a hole in the centre, slightly more than 2cm diameter, that I have been scratching my brain thinking of ways to use them in my tatting.  Finally, I came up with something to share. I am naming this Ferris Wheel ornament.


I found out that they are called donut beads.

Round 1

With Round 2 added

The stitch count for the ornament is given in the photo below.  Round 2 requires two shuttles.


2 Dec 2020

Lockdown Tatting

I have been working on this doily since May this year.  It is a Jas Stawasz pattern, Doily 1 from his book Tatting Theory and Patterns.  I needed a long term project and this seems to be the biggest that I can find to fill my time during the various stages of the lockdown which has been in place since March this year.  

(There is another project from a Japanese tatting book that would need my full concentration but I am not ready for that one yet, :))


This is the status of the doily as at Round 7; there are 15 rounds in all.

After I started on Round 8, I discovered a mistake two rounds down, in Round 6, that I had to do a bit of tatting surgery to fix.


Thankfully it was not a difficult fix and it saved me from re-doing two rounds. 

Round 8 is moving along smoothly and I will share that in another post.


16 Sept 2020

Tatting project Updates.

 No new projects started since the completion of Harmony Tat-along, here is an update of a couple of WIPs

Jan Stawasz Doily 1, from Tatting Patterns and Theory.

I am still doing the individual motifs of Round 5, and there are six more to go. Upon completion of Rd 5, this doily will be about 28cm wide; still a long way to go to complete.

Thread is Coats Mercer size 40.


This square mat is my own design, made up of nine motifs joined together with four filler motifs.
Thread used is Olympus Special Gold Label in two shades, red and light variegated red.
Finished size is 23cm square.


28 Aug 2020

Back to basics

With no new ideas in mind, but the fingers itching to tat something, I decided to go back to basics.


Hens and Chicks must be among the oldest tatting design there is.  I would be interested to know the history behind this design that has really stood the test of time, if anyone knows.

Most recognised as an edging pattern, there have been several variations of it.  I turned this pattern in to a small star, at one time.


I called this pattern Star Chic and the chart is given here.

18 Aug 2020

Threads That Bind - full chart

I finally managed to put together a chart for the Threads That Bind Doily.
This would be the largest tatting chart that I have drawn (14 rounds).  It was not easy; I had to restart a few few times because the rings and chains didn't come out in proportion to each other the way I like them to be.

I have posted pictorial instructions for the doily in several posts when the tat-along was on.  This final post will be for completeness.


I hope the chart is clear enough to read the stitch counts. Opening the image in a new tab may enlarge it.

14 Aug 2020

Jan Stawasz doily again

This Jan Stawasz Doily 1 from his book Tatting Theory and Patterns is my long-term project that keeps me tatting in between burst of ideas.


I am at Round 5/15 now, which is made up of individual motifs. This round will take a while to finish as I don't exactly fancy individual motifs in a round. Thankfully, it is only this one round.

The thread I am using for this is Coats mercerised cotton in size 40.  A beautiful thread to tat with; tats smoothly and seldom twist when closing rings.  Sadly, I think this thread has been discontinued, but I have enough to complete this.

11 Aug 2020

Harmony with full chart

Harmony in full.

Full size is 18cm across.

Thread: Olympus Gold Special, M15 - variegated, 901 - black


This is the full chart for Harmony. Please refer to the various posts for the charts of this one doesn't show clearly for you.  

Links to charts for the different rounds;


Harmony Tat-along: Rounds 7 & 8, final two rounds

 Here is the last two rounds of Harmony tat-along, Rounds 7 & 8.

These two rounds have longer chains that the other rounds. You may see bowling after Rd 7 but it will flatten out when you do Rd 8. Blocking will also flatten the rounds, and I would highly suggest that.


2 Aug 2020

Harmony Tat-along - Round 6

This is the stitch count for Round 6 of Harmony.
You may notice a slight bowling after Round 6. You may block it after this round and straighten the chains as you do.  This will flatten it.

The Josephine knots (Jk) are made with 10 half-stitches.  I made mine with first half-stitches, then I add one second half-stitch at the end before closing.  I find that they lay better that way.  You can tat the Jks by your any method that you are used to.

There will two more rounds after this.

26 Jul 2020

Harmony Tat-Along

This pandemic is going to stay for a lot longer that what all of us had wanted.  The numbers are not good in some places.  Here in Malaysia, we are looking into the possibility of another round of more strict lockdown, after the rules were eased slightly, after the number of cases started to increase again. 

And so, for those who chose to stay indoor or self isolate, here is another tat-along that you may want to try.

This will not have as many rounds as the Threads That Bind (re-named from 14-day challenge) as it will only have eight rounds.  Below the chart for for the first five rounds.


Round 1 requires two shuttles.  If you are used to making small joining picots, I would suggest that you make them slightly bigger for this as there is a tendency to bowl slightly.


Rounds 4 and 5 requires two shuttles.


This is the full chart sans stitch count to enable you to plan your colour choices, if you wish.  I will update the missing counts for rounds 6-8 when I have tested and verified them.


11 Apr 2020

14-day Challenge renamed to Threads that Bind

Here are the last two rounds of the 14-day Challenge (with a twist).

Day 14
Ring A is (4-4+4-4), joined to previous round as shown.
Ring A is repeated for the following 8 rings.
Ring B is (6-6), joined as shown.
Please note how the two ring Bs are joined to the previous round.

All Chain Cs are (5-5)
I have given a challenge to those who are following my facebook page, to create their own final round.  Some have finished by taking up the challenge and shared photos.  If you'd like to view some of the finished work, please go to the 'Threads that Bind' album on my facebook page, where I compiled photos of the finish work. I am extending the challenge to my blog followers as well.

If you are not yet confident of creating your own final round, here is mine if you chose to follow this,

Day 14 - Final round

Ring A (5-5)
Ring B (4+4-4-4), joined to 2nd Ring A as shown
Ring C (4+2-2-2-2-4), joined to Ring B as shown
Ring D (4+4-4-4), joined to Ring C as shown

Chain E (5+5-3), joined to cjaon in round 13 as shown
Chain F (3+5+5), joined to Chain E and chain of round 13 as shown.

Repeat Ring A, joining to Ring D as shown.
This is my doily with the 14th round still in progress.


Footnote:
I began this doily as a challenge to finish a design in 14 days. The significance of the 14 days would be fully understood by now. At about that time, the Government of Malaysia had announced a controlled movement order (CMO) and everyone were required to #stayhome. On Friday 10th April, the Government announced a continuation of the CMO until 28th April. 

Knowing that many other countries are also in similar situation and also took similar approach of a lockdown, I shared photos-instructions for the doily one round per day, inviting tatters to tat-along with me. Tatters are really awesome folks. Many had joined the tat-along and it was wonderful to see the different colours used for the doily. In recognising this, I have given  a name to this doily as 'Threads that Bind' to reflect the strong bond among tatters, no matter where we are.

#staysafe #stayhome

3 Apr 2020

Rounds 8 to 12 of the 14-day challenge

I am almost done with the 14-day challenge.  It was meant to be completed in 14 days but I have overshot by a few days.  I am now on the final round of 14, and ran out of the green variegated thread.  Will be looking into my stash for matching thread.

Here are the next five rounds:

Day 8
The stitch count for Day 8 is as Day 7 but with an additional ring of (3-3+3-3) added to the set.
There should now be 4 of the rings between the two adjoining rings flanking them.

Day 9
Ring A is (6+6), joining as shown.
Ring B is (3-3+3-3), which are the three rings following A.
Ring C is (4-4+4-4), joining as shown.

Chain D is (4-4), together with 4 other chains that follow.
Chain E is (5-5).

Day 10

Ring A is (6+6)
Ring B is (3-3+3-3)
Ring C is (4-4+4-4)

Chain E is (4-4), repeated for the collowing four chains (5 chains in total)
Chain F is (5-5-5)
Chain G is (5-5)
Day 11
Ring A - (4-4+4-4), 5 rings in a row;
Ring B - (6+6), 2 rings of Bs joined as shown;
Ring C - (3-3+3-3)
Chain E - (5-5), 5 chains in a row;
Chain D - (4-4), 4 chains in a row;
Repeat Chain E and this completes one repeat.

Day 12
Ring A - (4-4+4-4), 6 rings in a row;
Ring B - (6+6); 4 rings in a row. Please see carefully how these 4 rings are joined)

Chain C - (5-5); 5 chains in a row;
Chain D - (5-5-5);
Chain E - (4-4);
Repeat Chain D and this completes a repeat.

25 Mar 2020

14-Day Tatting Challenge

[This topic was posted in my Facebook Page, Tat-a-Renda a few days ago.]

To keep my mind active and not be thinking to much about the current situation, I have embarked on a challenge for myself.  I called this my 14-day Challenge; i.e. to complete a new design in 14 days.  It is a challenge for me, but you are welcome to join me and tat-along.  There should be be no rush on your part.

Instructions for Day 1/14 to Day 7/14 has been posted in my Facebook page. I am now sharing this here for tatters who don't frequent facebook.  I will update the coming days' instructions in Facebook and copying it here as well.

Day 1/14

Day 2/14
If you see some bowling appearing, you can change the chains count to (5-4-4-4-5).
That is the feedback I get on my FB page from tatters who have tatted this.

Day 3/14

Day 4/14
All rings are (4-4-4-4) , with joins as shown in the photo.
All chains are (4-4-4-4)

Day 5/14
The big rings are (4-4-4-4) placing the joins as shown in the photo.
The small rings are (5-5), placing the joins as shown.
Short chain are (4-4) and long chains are (5-5)

Day 6/14
Small rings are (6-6) joined as shown.
The slightly bigger rings are (3-3-3-3), joined as shown.
All chains are 4 counts separated by picots.

Day 7/14
Similar counts to Day 6, but with an additional  (3-3-3-3) ring for each segment.
All chains have 4ds separated by picots, as shown.
After Day 6/14, I see a trend emerging in the design which I quite like. The piece can now be separated into eight segments and the pattern for Day 6/14 be repeated for each segment. As you can see in Day 7/14, the instructions for Day 6/14 is repeated but with an addition of one (3-3-3-3) ring in each segment. I plan to continue with this trend for a few more rounds.

p.s. Some have asked for a detali written instructions for this.  I am not going to do that at this time.  It will take much longer for me to write the full instructions and will not be able to meet my challenge if I do that.

Stay safe and stay in

14 Mar 2020

Another bookmark pattern

I am slowly updating my patterns in this blog with patterns that I have posted in my Facebook page ( https://www.facebook.com/tatarenda.my/ ).

Here is a simple and quick one to fill the time if you choose self-isolation during this present time. I am praying that everyone will be safe and  do stay calm.

I am naming this bookmark Golden Crane just because of the image on the cover of the book that I used for this photo, 😄

Pattern required two shuttles.


Stiitch count for Part 1

Stitch count for Part 2

28 Feb 2020

An alternative look at bookmarks

All this while I have always looked at bookmarks with two sides of the same design running the length of the bookmark.  Then, a thought crossed my mind that one edge of the bookmark will always be flushed to the spine of the book. What if I focus on the other side and have some creative and flourish design while keeping the other side simple and straight?

Here is the first result of my thoughts, a basic rings-and-chains with clovers as thrown rings


I like this idea and may work on a few more designs. This is a simple design, and I am sharing the chart here should anyone who wants to try it.


If you wish to venture further, take a look at any straight edging pattern and see if you can turn it into a bookmark.

Don't forget to credit the original designer of the edging pattern if you do use it for your bookmark.  It may be re-purposed as a bookmark but the original edging design and pattern is still the original designer's copyright even if it is freely available online.

14 Feb 2020

Jan Stawasz Masterpiece Doily - 2nd time.

Sometime in July 2016, I started on the Jan Stawasz Masterpiece doily all in white.  I finished the doily in June of 2018, tatting with size 20 Hakelgarn Online.

I have not posted a picture of the finished doily since completion as my laptop had gone kaput. Now that I had gotten myself a new computer, here is a photo of the completed doily.


I don't usually do a re-tat of a pattern,  but I have been seeing beautiful colourful photos of the JS Masterpiece in a FB group dedicated to tatting this doily.  I just had to make another one, in colours this time.


To challenge me further, for this 2nd time I am tatting using size 80!  Here it is up to Round 5.

This is another one of Jan Stawasz designs from one of his book, Tatting Theory & Patterns (if it is not in this one, then it should be in his other book).

This mat was tatted in size 40 and gifted it to a friend.  I had to make something for her since she had generously given me four 50gm balls of the tatting thread which she had been keeping for years and not used if for anything.

Muskaan M's DAL (Design Along)

I accepted the challenge by Muskaan M inviting tatters to join her Design Along (DAL) where she posted the design for the first two rounds a...

Many liked this from earlier