28 Sept 2012

Edgings for Embroideries

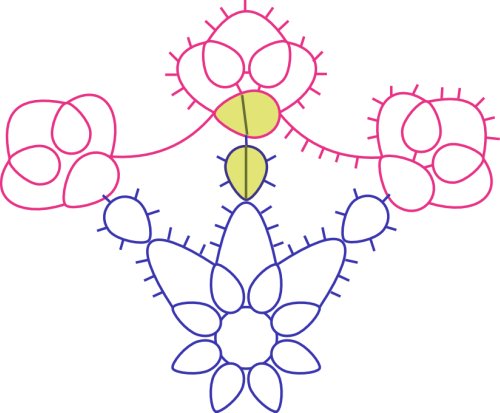
This Norma Benporath designs was published in The Queenslander on 3rd January 1935, and is of a set of five dainty edging designs. This is the chart for the edgings.


As before, click on the chart to enlarge the image.  Then, right-click on the enlarged image and choose "save image as" to save the chart to your computer.

A few notes regarding this chart:

  • The single digit in the center of rings shows the stitch count between picots. 
  • All chains have 3ds between picots.
  • All, except for Edging 2, are worked best with two shuttles though it is possible to use shuttle and ball and utilising the shoe-lace trick where required.
Below are my models of the edgings.  Almost all are curving up, especially Edging #2, though they will straighten up with blocking, I think.
I have tatted these earlier and posted about them in my blog.  Please read up the earlier posts here, here and here.

Besides sharing her beautiful patterns, Norma also gave hints and tips on tatting.  This hint was given at the end of the article,
"When working diagonal chains similar to these in Edgings 2 and 3, after each has been worked, slip the shuttle forward under the thread which is still on the left hand without making a stitch. Release the ball thread, and make the next rings as usual. Passing the shuttle under the chain brings the thread in the correct position for the next ring, and the chain will not be twisted."
Could this be about doing the shoe-lace trick?

I am really enjoying seeing the different versions of this Lace Mat in the variety of thread used by different tatters.  I have not been keeping count of how many tatters are tatting this since the doily is showing up all over the place in blogs, websites and Facebook.  As for my Lace Mat, this is where I am at now,
Thread is Milford size 40
One more round to go and it will be done. You'd probably guessed already from the picture that I will be using a split ring to start the last round. 

20 Sept 2012

More notes on the Tat-along Lace Mat

Progress has been slow on the Lace Mat doily.  This is where I am at with the Lace Mat, didn't even manage to get a good picture of it.
The progress of the other doily is slow as well.  I have only completed the third oval and there is another three to do.  After that I plan to tat the first row of the mesh of ring in each of the three colours that I am considering to see how each would actually look against the yellow.

To help you visualise the clovers with split rings as suggested by Hegla, here is a chart showing the split rings.
The red arrow show the direction of the split rings.  As Hegla has written, all the split rings are uneven split rings, i.e. the ds count is un-equal between the first half and the second half.   Before starting Ring B (and Ring E) leave a small space in thread to form a mock picot join.

The other thing to look out for is, Ring E is joined to Ring A on the un-flipped side of the split ring.  I searched for instruction/videos showing how to join on the un-flipped side of a split ring but I couldn't find any.  Will update this part later when I find it.

Thanks to Susie and Fox for the links showing how to join on the un-flipped side of a split ring. The two joins are:
Lily Morale's Larks Head Picot join from Paradise Treasures
Video by Frivole - Joining on the second half of a split ring

The way that I make my join is like how Frivole does it.

17 Sept 2012

Instructions for the Stand alone Clovers in Lace Mat

I am trying to catch up with e-mail request for the pdf files.  If you have sent me an e-mail but have not received the file, please e-mail me a reminder.

You can also save the chart direct from the computer by right-clicking on the mouse and choose "save image as".  This will download the chart to your computer which you can save.

Please note:
I have not actually tatted the Lace Mat using the split as my explanation in the earlier post.  It is possible that the position of the split rings maybe be switched when taking into account 'reverse work' in the tatting process. This is my progress so far, not much have been added to it actually.
Thread is Milford size 40 solid blue
I use the split ring from Rd 1 to Rd 2, but have decided  not to use it for the other rounds. I like my rings to have regular shapes.

Meanwhile, Hegla has suggested a solution for the clovers to be made in Round 4, using a series of split rings.  She has given me permission to share it here.  The steps begin at the short chain where the clovers are attached to, referring to the chart.


-Chain: 4-3
-Uneven split ring A: 3(join to picot of above chain)3-3-3//(other half of
the split ring)3-3 [remember to go into the next uneven split ring by leaving a bit of thread to simulate a mock picot]

-Uneven split ring B: 3-3-3-3-3//6
-Regular ring C: 3-3-3-3-3-3-3-3-3-3
-Uneven split ring D: 3-3-3-3-3//6 [remember to go into the next uneven split ring by leaving a bit of thread to simulate a mock picot]

-Uneven split ring E: 3-3-3-3//3(join to picot of split ring A)3
-Chain: 3(join to picot of last uneven split ring)4

Thank you Hegla.  I amd all other tatters appreciate this very much.

Planning Ahead

After being tatting for over 10 years I realised that tatting involves a lot of planning.  It starts with deciding:-

  • what to tat, 
  • which pattern to use, 
  • which thread, 
    • what colour, 
    • what size
  • any beads to add
  • needle/shuttle
    • one shuttle/2 shuttles, etc.
This post will touch on one aspect of the forward planning in the tatting process itself.

It is generally accepted that tatters will always make an effort to reduce the number ends to hide at the end of the project.  There are various techniques that can be used to hide ends such as,
  • sewing in,
  • magic thread,
  • even the single-shuttle split ring, where possible.
Deciding how you hide the ends will need some planning on where you start and where you are going to end.  For example, where to place the auxiliary threads to pull the ends through if using the magic thread method.

One consideration to reduce the number of ends is to use either split rings or split chains, or both to jump into the next round.  It is easy enough to say 'use split ring to go to the next round" but not all patterns indicate where and when to use these techniques.  This is where planning ahead will help to smooth the flow from round to round.  Using the chart for the Lace Mat, I will try and explain what I usually do for cases like this.

The Lace Mat has four rounds (minus the stand-alone clovers) and after studying the pattern, I think it is possible to make all four rows without cutting the thread at any row until the last.

The obvious place to start is with the inner small ring followed by the chain after it.  Instead, I started with a chain on the right side of the ring (shown in green), continue as the pattern with the small inner rings and chains.  I end with the other side of the chain, which I then join to the start of the first chain.  The final ring of Rd 1 is a split ring, which takes me up to Round 2.
Round 2 begins with a split ring. But, rather than making a split ring for the first ring followed by the chain, I need to study the steps for Round 3 first to decide how the split ring should be. 
Round 1 to Round 2
Round 3 is joined to round 2 by the rings on each side of the scallop-shapes.  Therefore, I should start Rd 2 where it would allow me to go to the first ring of Round 3 the shortest way possible.  Looking at the chart, I see that I'll need a split chain for this.  This tells me that I need to make another split ring after the first split ring of Rd 2.
However, there are two rings to each scallop, joined to the first ring of Rd 2.  I need to decide which ring to make the split ring, else I will not be able to jump to Rd 3. In this case, it is the ring on the left in the chart below.
Round 2 to Round 3
 After making this 2nd split ring of Rd 2 (3rd split ring from the start), I work the chain and the subsequent rings and chains following the pattern.  The last chain is going to be a split chain, followed by a split ring for the start of Rd 3 (blue in the chart above).

Rd 3 continues with the long chain following the pattern.  The last chain of this round is a split chain followed by a final ring as a split ring.

Round 3 to Round 4 requires two splits ring as seen in the chart below.  The next steps continues as in the pattern until the end, and if my plans are right, I will end up with only two ends to hide
Round 3 to Round 4
However, do not forget the clovers.  There are ways to work the clovers as part of Round 4 utilising split rings but I have not looked into it in detail so I can't be sure that it will work.

A point to note here is, using split rings changes the shape of a ring, especially if it is an imbalance or uneven split ring, i.e. the stitch count of the first half is not equal to the stitch count of the second half of the split ring. The first split ring of Rd 2 is an imbalance split ring.  And, if you are particular about the shapes of your rings, like sometimes I am, you may have to endure the cut-and-tie to get the shape of the rings that you want.

In conclusion, there are various techniques that can be utilised to make tatting easier and saves time at the finishing end of it.  Here are a few points to consider:-  
  • Study each pattern and identify where they can be used well before starting.  
  • If there is a chart with the pattern, mark the places where you plan to use the techniques.  A clear picture of the tatting is sufficient if the pattern does not come with a chart.  
  • You may need to change the starting point to utilise the different techniques, such as split ring & split chains to move to the next round.

12 Sept 2012

The Lace Mat

I wrote to the National Library of Australia (NLA) expressing my intention to rewrite the tatting patterns published in newspapers in Australia from the early 1930s.  I personally want to do this to preserve the designs and make them accessible to current tatters who may find it cumbersome reading patterns written in the earlier style.  I am happy to say that the NLA has no objections provided that I cite the original source of the patterns that I have done with each re-write/chart that I share in my blog.

The Lace Mat is the first pattern by Norma Benporath that I tatted.  It was published in The Queenslander on  16th March 1938 (the Trove site is currently having technical difficulties so you may not be able to see the actual tatting shown in the newspaper).  I have now completed the chart and am happy to share it here.


A few points that I'd like to mention regarding this doily and the chart.

  • The stitch count between picots is 3ds throughout, except for a few rings and chains as seen in the chart.
  • There are four rounds, each in the different colours shown.  The clovers at the top are tatted separately and joined to the doily at the picots.
  • When tatting the first round (blue in the chart) it will appear as if the piece is not turning out right with the overlapping of rings and all, but it will flatten out when you join the last ring to complete the circle.
I plan to tat this again since that first piece has been given away.  Anybody care to join me? We can have a Tat-along of this doily.
Click on the chart to open it larger, then right-click on the enlarged image to save it on your computer.  If you still have difficulties, pleas e-mail me for a pdf of the chart.  I may only be able to e-mail it to you a day later as I may not be online when you send the e-mail.

10 Sept 2012

Let's vote

Here are the three colours that I am considering for the next part of the NB doily, which is made up of the mesh of rings:
Lizbeth 623 - Raspberry pink light
Lizbeth 683 - Leaf green light
Lizbeth 684 - Leaf green medium
The yellow is 613 - Golden yellow medium and the multi-coloured thread is Lizbeth 132 - tropical punch.  If you have these colours in your stash, you can make the comparison yourself and let me know what you think would be the most suitable colour.

9 Sept 2012

Another picture of the doily in progress

Here is a close up of the oval for the next round of the Norma Benporath doily.

In the original pattern the two clovers at each side are stand-alone clovers. "Stand-alone" clovers is a common feature in most of Norma Benporath's tatting that I have tatted.  Each one usually stands on its own without any chains holding it up and connected to the other parts only at the picots.  Rather than doing them separately, I have added in chains joined to the centre motif thus making it possible to the centre in one pass.

These ovals are joined the the rest of the doily like so,
The space between the ovals will be filled by a mesh of rings to cover a space of about 4in. wide.  I have not decided what colour thread to use for the mesh of rings.  I can continue with the yellow but feels that it will be a bit too bright.  Using the multi-coloured thread will create a big blob of colours without any clear defined pattern, as sometimes happens when using variegated/multi-coloured thread.  Furthemore, using either will add to the fiery nature of the whole doily thus far.

So, I am considering toning it down by using this shade of pink as in the picture below, unless I go the opposite and use something like green!


Tetradill - a square motif

 I was travelling in Xi'an, China and saw designs of pavement tiles that I like. This design was inspired by one of the tiles. The photo...

Many liked this from earlier