1 Jun 2012

Tatting Updates

I did a 'Diane' and tatted MK's Spinning Wheel Glass Mat.  I can understand why Diane keeps going back to it.  It is an easy pattern to remember because the stitch count is the same between picots throughout. But I did make a few mistakes, especially with the row of three rings because I kept joining them up together.

Here is my (first?) Spinning Wheel Glass Mat,
MK's Spinning Wheel Glass Mat, thread is HDT by Zarina
With the balance of the HDT, I started on the 'Amusement Doily' by Celtess. The link will take you to the pattern.
As you can see, it is not quite the doily as in the pattern.  I was running out of thread as I finished the 3rd round, so I made up the final round.  The actual 'Amusement Doily' is much more prettier than my aborted attempt.

Next is the update on the butterflies from  Adelheid Dangela's Tatted Butterflies that I started here and here.
Diana - with thread ends unhidden and turn into long tails
The next one is Elise and my attempt to tat in one pass.
Elise
The butterfly on the left is the one attempted in one pass incorporating additional techniques of split ring, split chain and alligator join.  The one on the right is the second attempt with two rounds.  I had some problems tatting Elise - the pattern is charted but the section of the body of the butterfly did not show the stitch count.  I had to refer to other charts in the book for similar looking body and follow the stitch count from there.

Finally, my double-point hooks arrived this week,
This double-point hook is the work of 'im in the garage, who also produce the pop-a-bobbin shuttles, which you can see here in JaneEb's blog. Jane calls them Hooks with hats. I am so happy with what I received.

I am busy tatting for an event in June.  More about that in another post.

19 May 2012

Doodling

I've been tatting ... but not the time to show them yet.  So in between, I doodle a bit.  This is one of the doodles.

Single-shuttle Ring-on-Ring
The one below is where the lower ring is joined to each other.

Not sure if there is a need to look further into this since using 2-shuttles mock ring technique with thrown-rings off it will achieve almost the same result.

Oh well ... nice to know that it is possible.

9 May 2012

New Shuttle

My Tatting Forums shuttle arrived today, and I think it is both pretty and special. This is another of Chris & Erin Hinton's shuttle made by order for the members of The Tatting Forum.  Membership certainly has its advantages.


What is so special about this shuttle is shown on the other side.
Each shuttle is etched with the member's name and membership number.  My number is '57', which is also the year I was born.  How much more appropriate and unique can that be?

4 May 2012

Progressing with Elise

I am really enjoying working through Tatted Butterflies by Adelheid Dangela, which explains this post coming so soon after Diana.

Part of what's making this journey interesting is the challenges that I have put on myself.  Most of the patterns in the book so far, require the wings of the butterflies be made in two parts, first making the body and one side of the wings and the thread cut off.  Then the other wing is worked and joined to the body to complete the shape of the butterfly.

My challenge with Elise is to tat it in one pass. 
I have finished one side of the wings and am now working on the other wing.  I may undo that last chain and re-tat it slightly different to prepare for when I need to join it back to the body and finish the lower part of the body of the butterfly.

Will share what I have done when this is finished . . . . till next time . . . .

2 May 2012

Tatted Butterflies - Diana

The next one from the book Tatted Butterflies by Adelheid Dangela is Diana
Diana

Again, I have ended the butterfly at different place from where it was shown in the pattern to get a suitable place to hide the ends.  However, after looking at it for sometime, I may not want to hide the ends after all.    I may just leave them as they are just like this one here.

26 Apr 2012

Planning for the end(s)

I have been wanting to tat butterflies from the book Tatted Butterflies by Adelheid Dangela for a long time now, and finally got around to doing it .  There are many techniques used in the book that I have not tried before, or maybe just tried once before like block tatting, onion rings, and even mignonette style. Then,  there is the butterfly that uses the leaf pattern as in Ruth Scharf style, the long twisted picot, and even a cluny butterfly.

I have only tried tatting a cluny once before and that was only learning the technique, not even trying to make anything from it. I have to search the net for tutorial on cluny when I reach that pattern in the book.

I will be making the butterflies in the sequence they appear in the book.  To start with are these three butterflies.
Top left is Alfa, bottom left is Birte and right is Celine
Alfa is the popular 4-rings butterfly which is the upper one of the two.  I modified it slightly by tatting a head for the butterfly with a SSSR which is also to tidy-up the ends, instead of tying a knot.  I also used the SSSR  to finish the ends at the head of Birte which means that I had changed the starting point when I tatted it.

I tatted the head for Celine as an onion ring, but I think I made the antennae rather short.  I had some problems with the chains in the upper wings because they overlap each other, on both wings.

Below is Diana, still a work on progress with only one side of the wings done.
Diana - in progress
The ring in the lower wing is not an onion ring but a chain tatted over a ring and joined back to the base of the ring.  To hold the chain in place, it is joined to the top of the ring, in this case, with a Catherine Wheel join. I made the antennae with long twisted picots.

One side of the wing is done first and ends by joining it to the body.  But, that would leave me with a problem of where to hide the two ends because there isn't a suitable place where I can sew then in.  I prefer to sew in the ends because the other methods don't seem to work for me, except for the SSSR where suitable.   In this case, I am going to undo that chain and do it up again as a split chain coming form the body and ending at the join at the top of the ring where I have more choices of places to hide the ends.

If you have managed to read this far, you will understand the title that I chose for this post. In summary, it is important to decide what you plan to do with the ends even before starting a project.  Study the pattern or picture or chart carefully before starting. If using the magic thread method of hiding ends, mark out on the pattern where the auxiliary threads are going to be placed. It can be at the beginning or the at the end of the work.

In the meantime, I also made another kilt pin with tatting attached to it.


.... and tatted these hearts.
left, Queen of Hearts by Mary Konior; right, Happy Heart by Frivole

18 Apr 2012

Celebration!

Last Saturday was a celebration of sorts for a group of crafters.  It is the 5th Anniversary of the formation of the yahoo group Needle n Crafts which was held at one of the member's house in Kajang.  Thank you Mel for hosting this year's anniversary meet.

As with the previous anniversaries, there were gift exchanges and door gifts given out.  It was a good opportunity for members who attended to show off their skills (as if there needs to be a reason).  It was set that all who participated in the gift exchange to bring a bird that is made from any kind of craft. And, I think you will agree from the look of the birds below, that they are a crafty lot, in a good meaning of the word.


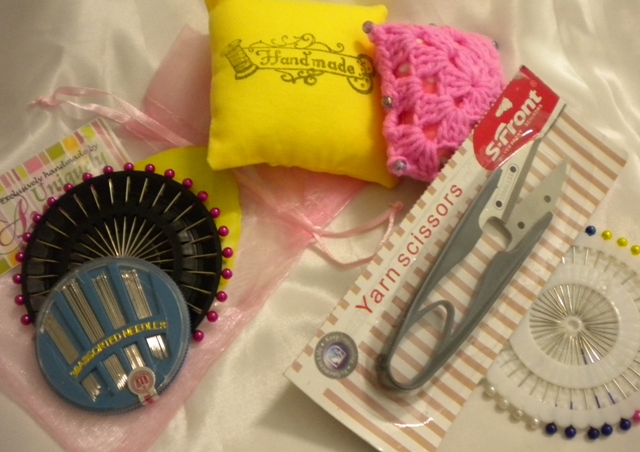
 Besides the gift exchange, there are door gifts for everyone present contributed by some of the members.  So even if some, like me, who did not participate in the gift exchange, we still took home some lovely items too.

From Nik - sewing needles, pins and tailor chalk; from Margaret - Handmade stamped pin cushion; from Usha - crocheted pin cushion; from Lillie - another disc of pins and a yarn snipper

Diane sent from the US - 3 skeins of floss and a packet of peach tea; Paul gave a couple of sewing thread; from Mel - a roll of fabric tape and self-threading needle; and Radha contributed a roll of ribbon

Sally wove baggage tags; Vivian shared some of her craft papers; and Shanny sent in a fabric purse all the way from Switzerland.
Even though I did not participate in the gift exchange, I too received a bird from Margaret.
 And, can you believe this, I was excited to see the plastic that the bird was wrapped in!  It got me thinking - they look like crochet but can the designs be tatted?
On my part my contribution for the door gifts are these,
Tatted one pair in each shade of Lizbeth size 40, left to right: 108 Sherbet Delight, 127 Butterfly Breeze, 132 Tropical punch, 109 Wildflower, 140 Turquoise Twist, 100 Falling Leaves, 138 Leafy Green, 131 Vineyard Harvest and 114 Seashells.
They are bookmarks tatted from the Mary Konior's "Anniversary" pattern from the book Tatting with Visual Patterns.  I think the name is appropriate since we were celebrating an anniversary too. I also tatted a pair in 140 Country Grape Swirl but did not take a photo of them.

But, these are not all.  Mel, the gracious host, also gave out these to everyone,
The cupcake is a dustcloth to remove static (e.g. from pc screen), huge buttons and a frame pin cushion.
It was like in craft heaven!
Thank you Mel for being a lovely host. Thank you everyone present for making it a wonderful morning.

And lastly, I wore this kilt pin brooch that day, which I made the night before.

Muskaan M's DAL (Design Along)

I accepted the challenge by Muskaan M inviting tatters to join her Design Along (DAL) where she posted the design for the first two rounds a...

Many liked this from earlier