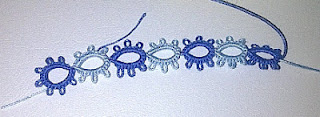
Continuing with the 2-colours SSSR
Still playing with the 2-colours single-shuttle split ring (SSSR), and here is another picture which shows the idea better than the previous one.
Some have asked how I did the SSSR and I will explain it here briefly. You'll need to know the basic of making a SSSR to follow my explanation.
You'll need two shuttle, each with a different colour thread, of course. Loop the thread from one shuttle round the fingers for the ring. When making the double-stitches in the first half of the split ring, you hold both shuttles together. The double stitch will be in the colour of the thread around the fingers made over the two threads as the core thread for the ring.
When the number of double stitches for one half of the ring is done, drop both shuttles and continue with making the second half of the ring with the same colour thread as the first half using the loop method of making the SSSR. Loop the thread of the other colour round the fingers for the next ring to alternate the colour of the rings.
I usually move my shuttle in a sliding method, i.e. sliding the shuttle over/under the core thread. But with two shuttles, I find it easier to use the reverse Reigo method as described in The Complete Book of Tatting by Rebecca Jones.
In my previous post, Martha Ess left a comment that she had taught this technique of 2-colour SSSR at Palmetto during one of the years. I don't know how Martha did hers, but I would think that it is not much different from how I did mine.
Gunhild, in her blog, expanded on this method and added thrown rings on one side of the split ring, which I think opens up new ideas. I should not forget the ever so resourceful Jane Eborall who has put together different variations of the SSSR in her techniques site.
Ever resourceful - bah humbug!!!! Just an old git with time on her hands and too much thread to play with!!!! Thanks for the compliment, though. Tickled me no end!!!
ReplyDeleteWell, thank you to the OG, ha ha ha
DeleteWhat a great idea Jon. I like your two-coloured SSSRs.
ReplyDeleteJon,
ReplyDeleteThis is such a neat idea. I am definitely going to try it. Thank you!
Sunela
Very nice idea!! :)
ReplyDeleteYes, I think that's the same way I do it. Isn't it fun!
ReplyDeleteHallo Jon! I also use the sliding method with the two shuttles. I take the same two plastic shuttles with a flat back, e.g. from lacis or the japanese ones. I hold both shuttles together, one ontop of the other. When I slide over and under the thread, I turn my right hand and so the shuttles also aside, to slide . That works wonderful.
ReplyDeleteI would like to know, what you mean with the reverse method of Riego. I am not sure what you mean, because I don't have the book of R.Jones. Can you explain what you mean?
Greeting from Gunhild
This video by Frivolite shows clearly the reverse Reigo method.
DeleteI find this method useful as an alternative method when I teach tatting.
Thank you Jon, haha, I didn't knew, that this way was called the "reverse Riego method"! Now I do;-)) I use it often for very huge shuttles full of beads. For the second half of SSSR I translated the sliding of the shuttle to my fingers. The same way frivole shows it now on her new SSSR video.Works fine for me.Have a nice day!
DeleteI like your two colour Idea, Well done
ReplyDeleteMargaret
I have been doing 2 colors with the SSSR on one of AnneB's dragons but I use a 2 bobin shuttle and the slip and slide. I put a picture in my Demo pics albums on InTatters. You use the color you want for the ring, wrap it around the hand like a normal ring, adjust a little so both threads are the same length, when you get to the split choose the color for the second half make the loop an place the shuttle with both bobbins through the loop and put a spare post shuttle on the loop for the second half, slip and slide this half and close the ring like you normally do a SSSR. The thread positions will already be in the right places for the other color to be the next ring. It took just a little practice and I can do them fairly fast this way now.
ReplyDelete