The Charm of Tatting
This Norma Benporath pattern was published in the Queenslander on 15th November 1934. As I wrote in the earlier post, I am going in blind with this one because the scanned picture from the newspaper only shows a big black square with what look like scratches of white for the tatting part.
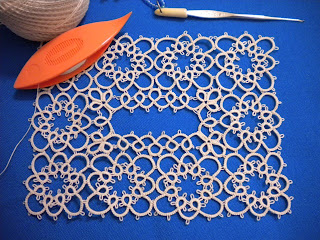
Surprisingly, the instructions for the first two parts were quite easy to follow and translated very well into tatting. I didn't have much trouble with it so far. Here is the picture of the first two sections or rounds.
The construction thus far is slightly different from the usual. The square motifs (with the eight rings) were made first as the foundation round, followed by the round on the inside of the squares. The original pattern was intended as an edging where a number of square motifs are made and joined together to form a big square shape. Then the inner edging is tatted all round. On completion of the whole piece, a piece of linen is to be sewn to fill the empty space in the centre.
But, I am not aiming for the full works and decided that I'll make a doily out of this. So, I have reduced the number of square motifs to just 4 x 3 squares and tatted the inner edging, resulting in a small empty space in the middle. I could have tatted two square motifs to fill the middle, but I will not be able to show you the inner edging as per the pattern. I will decide later if I want to leave the space as it is or fill it up with something or other.
The next two rounds needed a bit of thinking. I had to read the instructions for Round 4 to realise that I will need two shuttles for Round 3. Reading the instructions, I made a sketch of Rounds 3 and 4 to make sure that I get a reasonable shape for the two rounds.
Surprisingly, the instructions for the first two parts were quite easy to follow and translated very well into tatting. I didn't have much trouble with it so far. Here is the picture of the first two sections or rounds.
 |
| Thread is size 60 Anchor, with a Clover shuttle included for size comparison of the work. |
But, I am not aiming for the full works and decided that I'll make a doily out of this. So, I have reduced the number of square motifs to just 4 x 3 squares and tatted the inner edging, resulting in a small empty space in the middle. I could have tatted two square motifs to fill the middle, but I will not be able to show you the inner edging as per the pattern. I will decide later if I want to leave the space as it is or fill it up with something or other.
The next two rounds needed a bit of thinking. I had to read the instructions for Round 4 to realise that I will need two shuttles for Round 3. Reading the instructions, I made a sketch of Rounds 3 and 4 to make sure that I get a reasonable shape for the two rounds.
 |
| Sketch of Rounds 3 & 4 |
I like the design of that!! :)
ReplyDeleteAwesome! Love your work, as always! Thanks for sharing.
ReplyDeleteWOW! You are making me dizzy with the instructions, but you obviously are oblivious to any confusion here. This is marvellous!
ReplyDeleteFox ; )
that is going to be very pretty when you are finished. have fun. rounds 3 & 4 don't look too difficult after they were drawn out.
ReplyDeleteBeautiful! Greetings from Poland!
ReplyDelete