Tatting and Knitting
A short update on my knitting project which is a cardigan for my youngest girl.
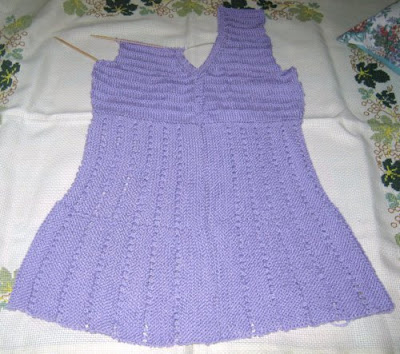
I have completed the lower part of the cardigan and the left side of the front yoke. I am now a few rows up on the right front yoke.
In between working on the cardigan, I decided to have another go at the bowling doily that I wrote about here. The doily is too pretty not to try again. I think this time it turned out very much better, only because I made some modification to the pattern.
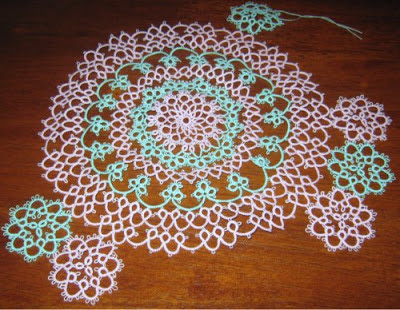
The rows that were giving me problems earlier were the two rows of rings-and-chains (seen here in pink). All the rings in the two rounds are supposed to be joined to each other. For the second try I decided to skip some joins and group the rings in sets of 2s and 3s. That solved my bowling problem. If there are any, it can easily be got rid of by pressing or blocking.
This worked well for the next round that is made up small round motifs. Again, to keep check on the bowling (in case it crops up again) I made the small motifs in groups of 3 and break them apart when joining to the earlier round. That way, hopefully, I can make small adjustments to my tension and picot sizes as I fill up this round.
There are three more rounds after this. Updates when done.
Such talent! I know all about your tatting abilities, but I see you are an expert with the pins as well! Very pretty!
ReplyDeleteNow hurry up and find that remaining ball, so that you can carry on tatting!
The doily is lovely .... and so flat! : ) Fox
It looks like you might have solved your problem-yeah! You are right it is too pretty not to tat. Your crochet pineapple doily is beautiful. I find crocheting goes faster in the big projects than tatting for me too. So far the count is tatted doilies-1 crocheted too many to count.Lol.
ReplyDeleteYour sweater looks lovely.
Wow you're so good Faizon!!
ReplyDeleteAnd congratulations on getting the doily to lie flat!
Both your knitting and your tatting are lovely! :)
ReplyDeleteLots of pretty things in this post! You are doing a beautiful job on your daughter's cardigan - she must be very happy. I also like the cross stitch you photographed it on!
ReplyDeleteYour doily is SO pretty!! And so flat! I guess being able to adapt a pattern to work for yourself comes with experience, although it also seems likely that you just have to have the gift of being able to "see" the finished product before it is completed to know where to begin with changing it.
Glad things are running smooth,
Ann
That cardigan is very cute. Would you mind telling what pattern you are using?
ReplyDelete-Katherine
Hi Jon! I just came back over to say thank you for entering my giveaway! Good luck to you!
ReplyDeletewow! Cepat nye u knit. Your tatting piece is nice. WHy is it called bowling doily? or is it just a name. Nice colours also.
ReplyDeleteThank you Fox, I have not knitted for a very long time. This is the first time I am doing it after more than 30 years. I am glad the stitches for the cardigan are just simple ones and nothing complicated.
ReplyDeleteHi Sue Anna, I don't tat or crochet many doilies. But I have a pending crochet tablecloth that is going into three years in the making, and it is not even half-done, :-(
Paul, you are not so bad yourself and you have accomplished a lot in the short time that I know you.
Thank you TattingChic. I hope I'm lucky with your giveaway draw.
Thank you Ann. All I can say is that skill improves with practise.
Hi Sayingthings, thank you for dropping by. The pattern was picked by my daughter. It is from garnstudio
Reen, bowling is a way to describe a doily that doesn't lie flat and and have a tendency to turn up like a bowl.
The cardigan is going to be wonderful. Lucky daughter! I love what you have done with the doily. Can't wait to see it finished.
ReplyDeleteHi Jon !
ReplyDeleteThanks for coming over to my blog where I tatted your lovely ‘Hearts Entwined’ pattern – it was great hearing from you! You deserve those compliments and then some! You have an amazing blog and lots of ‘eye candy’!
You say you have a lot to learn, and yet your wonderful tutorials AND beautiful diagrams (which take effort and time to post) are so helpful to everyone – even those of us who have tatted for years but are trying to catch up to the ‘new’ ideas. And you’ve even published a book!
Your “Magic Moment” snowflake is already on its way to becoming another favorite for tatters. Your designs are so elegant!
And your “Unlearning the Knot” post was great fun to read! It’s comforting to know that I’m not the only one who was confused about split rings, right-side/wrong-side, and ‘unlearning the knot’ after tatting for about 15 years! It all seemed to come ‘out of the blue’, although Teri Dusenbury’s tatting history helped make me understand how these things came about. When I demonstrate now, I can no longer say “you MUST ALWAYS flip the knot”. I now say “There are times when you don’t flip the knot, but you must become comfortable with the “basic flip” when you first learn to tat.” I hate to scare them off and confuse them too much!
As a fellow knitter, I must compliment you on your beautiful knitting project! It takes a lot of skill to do all that shaping! She’s a lucky girl! You may be interested to see the afghan I made 20 years ago (on my July 17 post). However, knitting squares is not as difficult as what you’re doing. Beautiful job!
Your work is beautiful!
ReplyDelete